Overview
This article provides instructions on how to integrate Jenkins with the Unified Agent.
Pipeline Job on Windows Using CURL
Download CURL, add it to your PATH environment variable.
Restart Jenkins in order for it to load the new PATH variable.
In the 'Pipeline' select Definition: Pipeline script, and add the following lines to the script:
NOTE: It is advised to use the below curl commands only once a week to download the latest version of the Unified Agent for performance reasons and not as part of every build. You can do this using a scheduler task, such as corn.
node {
  stage('Download WS Script') {
   bat 'curl -LJO https://github.com/whitesource/unified-agent-distribution/raw/master/standAlone/wss_agent.sh'
  }
  stage('Run WS Script') {
    bat 'wss_agent.sh -apiKey xxxxxxxx-xxxx-xxxx-xxxx-xxxxxxxxxx -c [path to config file] -project my-project -d [path to folder to scan]'
  }
}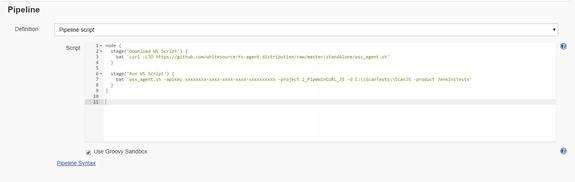
Note the following:
The first stage downloads the 'wss_agent.sh' script file to the job folder.
The second stage runs the script 'wss_agent.sh'. This script downloads the latest version of the WhiteSource Unified Agent JAR file and configuration file to your Jenkins job workspace. Afterwards, the script runs the JAR with the command line arguments of the Unified Agent.
Make sure to edit the Unified Agent configuration file to match your specific requirements.
You can combine the two stages into one stage.
Pipeline Job on Windows Using PowerShell
In the 'Pipeline', select Definition: Pipeline script and add the following lines to the script:
node {
  stage('Download Unified Agent Jar') {
    bat 'powershell bitsadmin /transfer mydownload /dynamic /download /priority FOREGROUND https://github.com/whitesource/unified-agent-distribution/releases/latest/download/wss-unified-agent.jar $pwd\wss-unified-agent.jar'
  }

  stage('Download Unified Agent Configuration') {
    bat 'powershell bitsadmin /transfer mydownload /dynamic /download /priority FOREGROUND https://github.com/whitesource/unified-agent-distribution/raw/master/standAlone/wss-unified-agent.config $pwd\wss-unified-agent.config'
  }

  stage('Run Unified Agent') {
    bat 'java -jar wss-unified-agent.jar -apiKey xxxxxxxx-xxxx-xxxx-xxxx-xxxxxxxxxx -c [path to config file] -project my-project -d [path to folder to scan]'
  }
}
Note the following:
The first stage downloads the latest version of WhiteSource Unified Agent JAR file to the job folder.
The second stage downloads the latest version of the WhiteSource Unified Agent configuration file to the job folder.
The third stage runs the JAR with the command line arguments of the Unified Agent.
Make sure to edit the Unified Agent configuration file to match your requirements.
Make sure that Background Intelligent Transfer Service (BITS) is enabled on the node running the job.
Free Style Job on Windows Using CURL
Download CURL, add it to your PATH environment variable.
Restart Jenkins in order for it to load the new PATH variable.
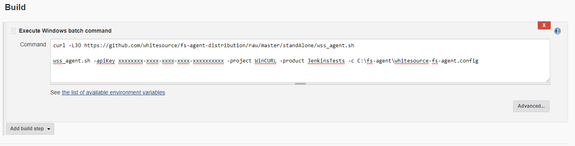
Go to Build, click on Add build step and then select Execute Windows batch command or Run with timeout.
Add the following commands on the new Command window:
curl -LJO https://github.com/whitesource/unified-agent-distribution/raw/master/standAlone/wss_agent.sh
wss_agent.sh -apiKey xxxxxxxx-xxxx-xxxx-xxxx-xxxxxxxxxx -c [path to config file] -project my-project -d [path to folder to scan]
Note the following:
The first command downloads the 'wss_agent.sh' script file to the job folder.
The second command runs the script "wss_agent.sh". This script downloads the latest version of the WhiteSource Unified Agent JAR file and configuration file to your Jenkins job workspace.
Then the script runs the JAR with the command line arguments of Unified Agent.
Make sure to edit the Unified Agent configuration file to match your requirements.
Free Style Job on Windows Using PowerShell
Go to Build, click on Add build step and then select Execute Windows batch command or Run with timeout.
Add the following commands:
powershell bitsadmin /transfer mydownload /dynamic /download /priority FOREGROUND https://github.com/whitesource/unified-agent-distribution/releases/latest/download/wss-unified-agent.jar $pwd\wss-unified-agent.jar
powershell bitsadmin /transfer mydownload /dynamic /download /priority FOREGROUND https://github.com/whitesource/unified-agent-distribution/raw/master/standAlone/wss-unified-agent.config $pwd\wss-unified-agent.config
java -jar wss-unified-agent.jar -apiKey xxxxxxxx-xxxx-xxxx-xxxx-xxxxxxxxxx -c [path to config file] -project my-project -d [path to folder to scan]
Note the following:
The first command downloads the latest version of WhiteSource Unified Agent jar file to the job folder.
The second command downloads the latest version of the WhiteSource Unified Agent configuration file to the job folder.
The third command runs the JAR with the command line arguments of the Unified Agent.
Make sure to edit the Unified Agent configuration file to match your requirements.
Make sure that Background Intelligent Transfer Service (BITS) is enabled on the node that is running the job.
Pipeline Job on Linux/Unix
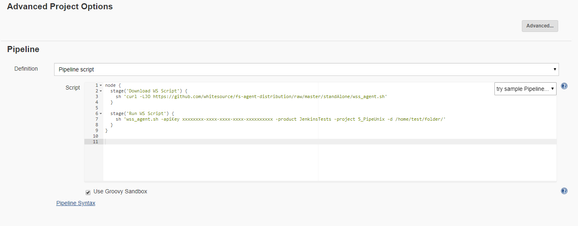
In the 'Pipeline' select Definition: Pipeline script, and add the following lines to the script:
node {
  stage('Download WS Script') {
    sh 'curl -LJO https://github.com/whitesource/unified-agent-distribution/raw/master/standAlone/wss_agent.sh'
  }

  stage('Run WS Script') {
    sh 'wss_agent.sh -apiKey xxxxxxxx-xxxx-xxxx-xxxx-xxxxxxxxxx -c [path to config file] -project my-project -d [path to folder to scan]'
  }
}
Note the following
The first command downloads the 'wss_agent.sh' script file to the job folder.
The second command runs the script 'wss_agent.sh'. This script downloads the latest version of WhiteSource Unified Agent jar file and the configuration file to your Jenkins job workspace.
The script runs the JAR with the command line arguments of the Unified Agent.
Make sure to edit the Unified Agent configuration file to match your requirements.
Make sure that you have permission to download/execute the 'wss_agent.sh' script.
Free Style Job on Linux/Unix:
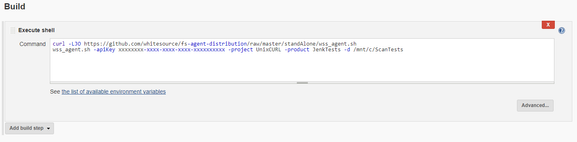
Go to Build, click on Add build step and then select Execute shell or Run with timeout.
Add the following commands in the new 'Command' window:
curl -LJO https://github.com/whitesource/unified-agent-distribution/raw/master/standAlone/wss_agent.sh
wss_agent.sh -apiKey xxxxxxxx-xxxx-xxxx-xxxx-xxxxxxxxxx -c [path to config file] -project my-project -d [path to folder to scan]
Note the following:
The first command downloads the 'wss_agent.sh' script file to the job folder.
The second command runs the script 'wss_agent.sh'. This script downloads the latest version of WhiteSource Unified Agent jar file and the configuration file to your Jenkins job workspace.
The script runs the JAR with the command line arguments of the Unified Agent.
Make sure to edit the Unified Agent configuration file to match your requirements.
Make sure that you have the permission to download/execute the 'wss_agent.sh' script.