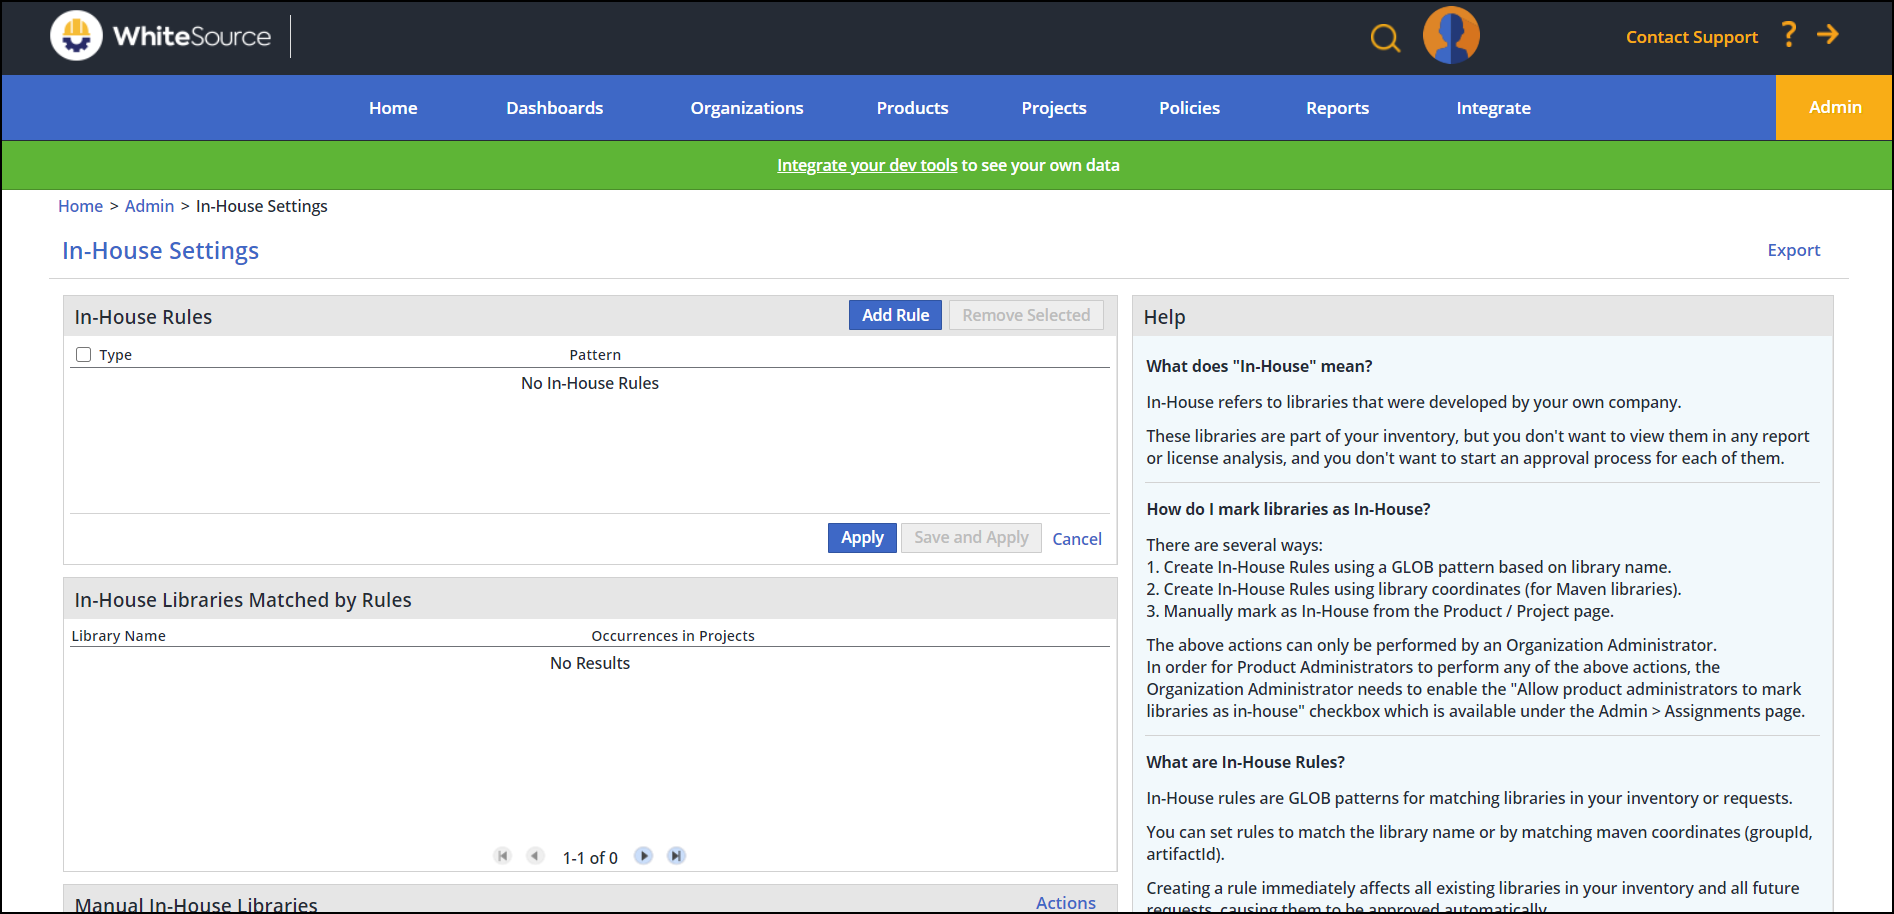
From the menubar, select Admin. The Organization Administration screen is displayed.
In the Settings area, select In-House. The In-House Settings screen is displayed (partial view displayed here).

This topic describes how to manage (add, remove, edit and view) In-House rules. In-House refers to libraries that were developed by your own company. In-House rules are applied by using glob patterns for matching libraries in your inventory.
These libraries are part of your inventory, but you do not want to view them in any report or license analysis, or initiate an approval process for them.
IMPORTANT Customers with installations of Vulnerability-based Alerting can view In-House libraries when filtering alerts by Resolved Alerts. |
Libraries can be marked as In-House according to the following ways:
Create In-House Rules to match the library name
Create In-House Rules to match the Maven coordinates of the library
Manually from Product / Project inventory
Please Note: The above actions can only be performed by an Organization Administrator. In order for Product Administrators to perform any of the above actions, the Organization Administrator must enable the "Allow product administrators to mark libraries as in-house" checkbox which is available in the Admin > Assignments page. |
To manage In-House rules, you must access the In-House Settings screen. Do as follows:
From the menubar, select Admin. The Organization Administration screen is displayed.
In the Settings area, select In-House. The In-House Settings screen is displayed (partial view displayed here).

The screen contains these areas:
In-House Rules – A list of all your In-House rules. A user can add or delete a rule using the appropriate button.
In-House Libraries Matched by Rules – A list of all the libraries that will be excluded from your reports since they were matched by one of your rules.
Manual In-House libraries – A list of all the libraries that will be excluded from your reports since they were marked by you as In-House.
Adding a rule immediately affects all existing matched libraries in your inventory and all future tickets, causing them to be approved automatically.
Add a rule via the following ways:
Create In-House rules to match the library name
Create In-House rules to match the Maven coordinates (Artifact ID, Group ID) of the library
To add a new In-House rule, do as follows:
Above the In-House Rules table, click Add Rule. The Add In-House Rule dialog box is displayed.
Select either By Name or By Library Coordinates (see above explanation).
If you select By Name, enter the glob pattern’s name
If you select By Library Coordinates, enter the Group ID and Artifact ID glob patterns.
Click OK.
Click Save and Apply.
Removing an In-House rule will cause all matching libraries to "reappear" in all reports and analyses.
To remove a rule, do as follows:
In the In-House Rules table, select the rule that you want to remove, and click Remove Selected.
Click Save and Apply.
To mark a library as In-House, do as follows:
Go to the Project and Product pages.
In the Libraries panel, select one or multiple libraries.
At the top of the panel, click Actions > Mark as In-House. The Comments for In-House Library dialog box is displayed.
Note the following if selected:
When a single library is selected, an in-house rule By Name will be created for the selected library matching the library name.
When multiple libraries are selected, an in-house rule By Name will be created for each selected library matching the library name (this applies even if the library file hash changes).
In Would you like to add comments?, add a comment for this action.
Click Yes. After marked as in-house, the selected libraries will immediately "disappear" from your dashboards and reports.
Note: Marking libraries manually is enabled only for the organization and/or product admin. |
To add/edit a comment for libraries, do as follows:
In the Manual In-House Libraries table, select one or more libraries to which you want to add/edit a comment.
From the top of the table, select Actions > Add/Edit Comment. The Comments for In-House Library dialog box is displayed.
Add a new comment or edit an existing one. If you are editing a comment, the newly entered comment will replace the previously entered comment(s) that were entered.
To unmark manual In-House libraries, do as follows:
From the menubar, select Admin. The Organization Administration screen is displayed.
In the Settings area, select In-House. The In-House Settings screen is displayed.
Select the library to unmark (checkbox on the left) and from the Actions menu, select Unmark Selected. The Comments for In-House Library dialog box is displayed.
Optionally, add a comment for this action. If you do, click Yes. If not, click No.
Libraries unmarked will no longer be considered in-house and will "reappear" in all reports and analyses.
Each manual In-House library has one of the following icons next the library name:
 - Library does not include a comment
![]() - Library includes a comment
- Library includes a comment
Hovering over a library with a comment displays the comment on the tool-tip, for example:
