Overview
The WhiteSource platform enables security and compliance professionals to enforce policies automatically throughout their Software Development Life Cycle.
Policies define a set of rules that reflect how an organization can handle specific conditions (such as restrictive license types, high-security vulnerabilities, etc.) that are detected in the open-source libraries used by its software.
An internal approval mechanism enables the review of new libraries that are added to a user’s inventory, in order to highlight those that require attention (for example, if they contain security vulnerabilities or restrictive licenses in the software, or if they are outdated, etc.). Note that the approval process, which is triggered automatically, enables the review of libraries before they are added by developers to the production code.
For every new library that is added to a project, WhiteSource generates a library approval request ( task). The WhiteSource Unified Agent automatically scans the open-source library code for vulnerabilities and security issues, creating an update request.
A library approval request can be generated only for new libraries that are added to an existing project. Requests for the approval of libraries added to new projects are not supported.
The review process investigates any new library that does not match an In-House or Whitelist rule to determine if they are permitted to be used. Each new library is checked against the policies. The first policy that matches the library will determine the action that will be applied to the request. A library can match only one policy.
According to the user-defined match and actions, a policy can be configured to approve or reject the library, de on its level of risk.
NOTE: You can set up customized Workflow Rules for all or a selected list of WhiteSource products or projects which will generate fix Pull Requests based on vulnerability severity or CVSS score. For details, see here.
How Do Policies Work?
When a new inventory request is uploaded to the WhiteSource server, the policies mechanism is triggered. The open-source library code is automatically scanned to see exactly which licenses, libraries and security vulnerabilities are in the code. Security or compliance professionals can decide whether any new library that does not match an In-House or Whitelist rule should be permitted or not.
Each organization can decide its own policies (at the organizational, product or project level) about which security issues and vulnerabilities are acceptable or not, de on their severity level, and which specific actions should be taken to handle them. For example, if the policy matches a library that contains specific licenses, you can approve or automatically reject it.
The following figure illustrates the library approval workflow:
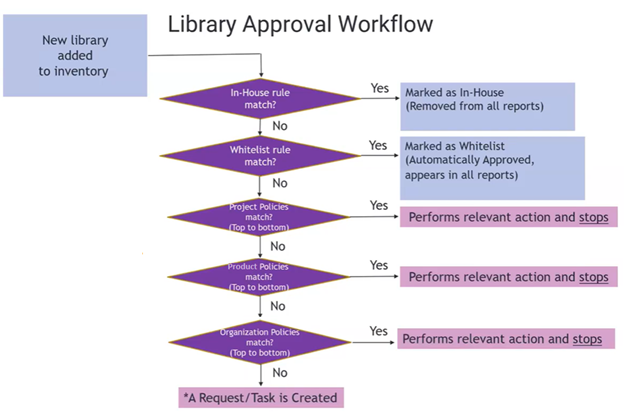
If the library contains no risk (i.e., the correct licenses are in the code and there are no security vulnerabilities), the Approve action can be applied to the update request for the library. The request will be automatically closed. The library will be combined with the security tests of the organization’s open-source code.
If the library contains unacceptable security vulnerabilities, the policy that matches this library will reject it. If one or more libraries were rejected by a policy, the Agent returns a policy violation exit code, which can be used to fail a build. In such a case, the library will not be updated in the inventory, unless the Agent is configured to update it regardless of policy violations (i.e., forceUpdate).
You can view a history of the policy violations from different scans in the Plugin Policy Violation History report.
A policy check summary report of the results is generated in HTML and JSON formats (located in the whitesource folder created in the directory from where the Agent was run) and can also be presented within the build server console via API.
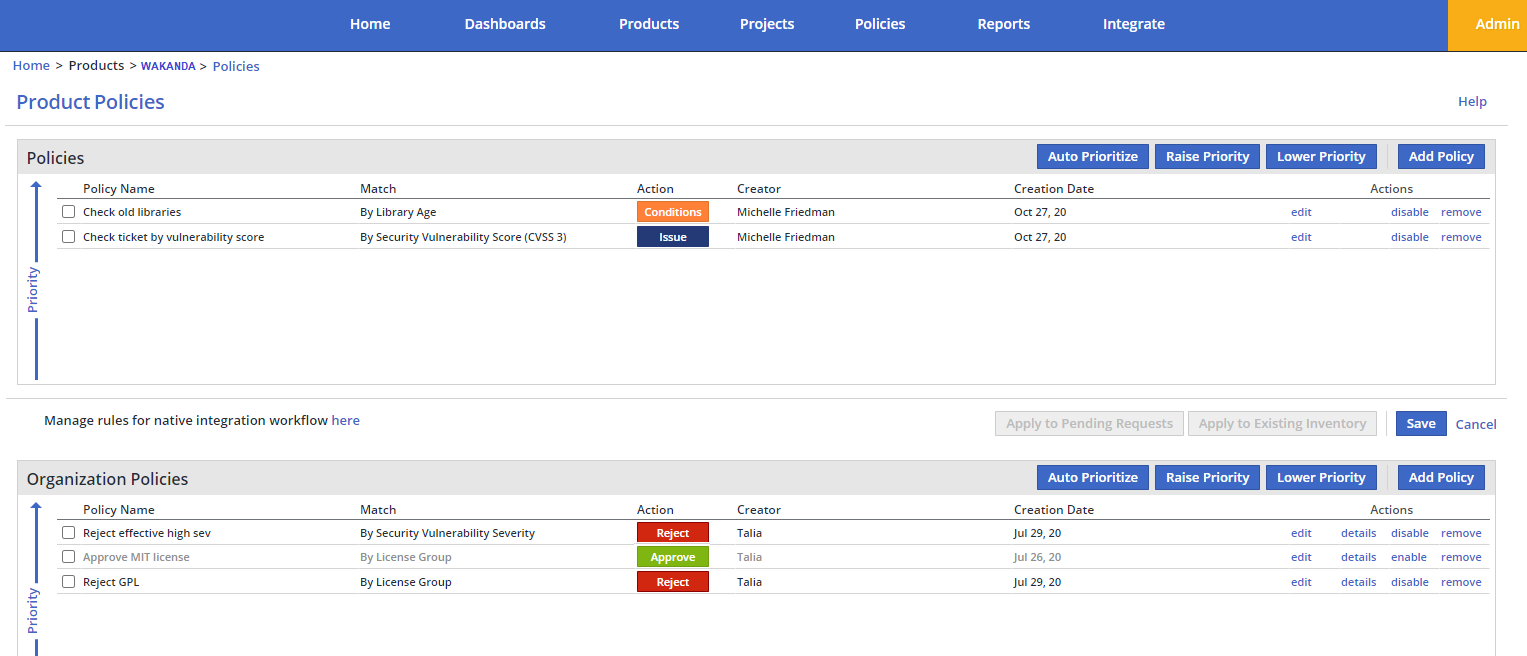
Matching a Policy to a Library
Libraries are matched with the defined policies. A match type defines which criteria of the library should be checked in order to determine if the action should be applied to it.
When defining a new policy for an organization, product or project, you can select the relevant match type according to a number of options.
The following match types are available:
Match Type | Description |
|---|---|
License Group NOTE: In the API, use "LICENSE". | The library license is matched against specific licenses in a selected group or a specific license group, and the policy is enforced per the rules. |
GLOB Pattern on Resource Name NOTE: In the API, use "RESOURCE_NAME_REGEX". | The library name is matched against a given GLOB Pattern. |
GLOB Pattern on GAV Custom Attributes NOTE: In the API, use "GAV REGEX". | The library's GAV (Group Artifact Version) strings are matched against the provided GLOB pattern. You can define only 1 or 2 of the 3 parameters (Group Id, Artifact Id and Version). For example, Apache (Group Id) and Commons (Artifact Id). |
Security Vulnerability Severity NOTE: In the API, use "VULNERABILITY_SEVERITY". | The library is matched against the security vulnerability severity. There are three levels of severity (as defined by the NVD): High, Medium and Low. The policy will perform the action on libraries that have a least one security vulnerability, per severity, with the selected severity. For example, a component with 1 High severity vulnerability and 2 Low severity vulnerabilities will be considered as High and the relevant policy will be enforced on it. If Prioritize is enabled, you have the option to apply this match only to libraries with Effective Vulnerability (i.e. at least one reported vulnerability was detected as a "red shield") by selecting the Only Libraries with Effective Vulnerabilities check box. |
Security Vulnerability Score (CVSS 3) NOTE: In the API, use "VULNERABILITY_SCORE". | The library is matched against the security vulnerability CVSS 3 score. The score can be any number between 0-10. NOTE: As of version 20.1.3, bug rating and version activity match types were removed. Existing organizations will no longer be able to add these match types when creating a new policy. They will remain, however, for organizations that already have this policy so they will still be editable. |
Library Age NOTE: In the API, use "LIBRARY_STALENESS". | The library is matched against the library age, which can be defined in months (1-240 months). The policy will perform the action on libraries that were released during the specified number of months. |
Primary Attribute Value NOTE: In the API, use "PRIMARY_ATTRIBUTE_VALUE". | If a component is marked with this attribute value, the library is matched against its attribute value. |
Library Request History NOTE: In the API, use "LIBRARY_REQUEST_HISTORY". | The policy performs the action on libraries according to previous actions which were performed on them. |
Exists in Product’s Inventory NOTE: In the API, use "PRODUCT". | The policy performs the action on libraries that were previously approved and available in the selected product inventory. |
Vulnerability Effectiveness (prioritize shields) NOTE: In the API, use "EFFECTIVENESS". | The policy performs the action on libraries that have at least one security vulnerability with the selected shield type: red, yellow, green, or grey. Selecting None for Vulnerability Effectiveness indicates a policy for libraries that do not have shields. NOTE: For customers with Vulnerability-Based Alerting enabled, grey shields are not displayed. |
Applying Actions to a Library
The Action is the operation the policy runs on a matched library.
NOTE: A library or request can be matched to only one type and execute only one action.
You can apply one of the following actions on a matched library:
Action | Description |
|---|---|
Approve | Automatically approves the library. The request will be automatically closed. |
Reject | Automatically rejects the library:
|
Reassign | Workflow - reassigns the request to a designated user or group in the system which is not the default approver. NOTE: For a Reassign action to take effect, the Open tasks for new libraries check box (Integrate tab > Advanced Settings) must be selected. |
Conditions | Workflow - automatically assigns conditions and open tasks on libraries. NOTE: For a Conditions action to take effect, the Open tasks for new libraries check box (Integrate tab > Advanced Settings) must be selected. A request is opened for the default approver and sub-tasks are opened as “conditions” for the different assignees according to the policy definition. Conditions will be automatically sent to assignees when libraries are matched. Conditions can be assigned to a single user/group or to different members of a group/organization. The Conditions are added to the Tasks panel and the Request Details page where assignees can view the original library request and update the status of the conditions after handling their assigned conditions. By clicking one of the following check boxes, you can choose to set conditions to trigger the automatic approval or rejection of the original request based on the resolution of the relevant assignees:
The assignee can mark the condition as Satisfied or Rejected. The assignee can also suggest to the approver another user to review the condition, by clicking Propose Reassignment. Only the approver is allowed to change assignees. The Default Approver can perform the following actions on conditions: Edit, Reassign, Override and Approve, or Override and Reject. |
Issue | Workflow: Issue tracker integration. WhiteSource policies can integrate with Ticket Management Systems (such as, JIRA or Work Items), enabling the automatic creation of tickets for tracking issues. When scanning the open source code, if vulnerabilities are found that need fixing, a ticket is automatically created in the issue tracker with all relevant information, addressed to the specific developers that need to fix the issue. After resolving the issue, the Security officer must check that the risk was mitigated. NOTE: For an Issue action to take effect, the Open tasks for new libraries check box (Integrate tab > Advanced Settings) must be selected. When creating an ‘Issue’ policy you can select the Jira Project to open the issue for the Issue Type (such as, bug), Priority and Assignee. The JIRA describes the level and match type of the policy, including the organization, product and project to which the library belongs. Additional information is also displayed that can help to identify why this library matched the policy (for example, if the policy match type is high severity vulnerability, the vulnerability severity and link will appear). When working with JIRA, if the issue type in the project requires mandatory fields, those fields are displayed and must be filled in. NOTES:
|
Scope and Prioritization of Policies
WhiteSource enables you to define a hierarchy for the policies in your organization according to the severity of rules in different projects and products.
Policies can be applied at the following levels:
Global organization level – all related organizations with the same account
Organizational level – all products under the organization
Product level – all projects under the product
Project level – the specific project
For each inventory item in the request, the system tries to match all relevant policies (organizational, product and project policies). If any project policies match, the product and organizational policies will be ignored. All remaining policies are sorted by their priority (provided by the user) and ONLY the top-ranking policy is applied.
In order to differentiate between policies, each policy is named according to its level, type of security vulnerability with CVSS score, license policy, etc., where relevant. For example:
[Global ORG] Reject no policy found
[ORG Security] CVSS [8-10]
[Product License] Reject GPL
The level at which a policy is applied dictates the order in which it will be checked by WhiteSource. Project level policies have the highest priority; whereas, global organization policies have the lowest priority. For each level, the policy which is topmost in the list has the highest priority.
When a library is matched by more than one policy, the policy with the highest priority will be run. Policy conflicts are resolved by priority:
Organizational level policies are of a higher priority than Global organization level policies.
Product level policies are of a higher priority than organizational level policies.
Project level policies are of a higher priority than product level policies.
In the Policy page, you can change the priorities of policies by using the following buttons:
Raise Priority | Select the required policy and click to raise its priority. |
Lower Priority | Select the required policy and click to lower its priority. |
Auto Prioritize | Click to prioritize policies based on their action, in the following order: |
In cases of more than one organization, for example, when each organization has a different independent division or represents a different product line, you can define different policies for each organization.
In some cases, you might need to set different policies for different products. For example, when each product represents a different product line or when it is necessary to differentiate between products for internal-use and distributed products.
In cases where different policies are required for different stages of the software development lifecycle (SDLC), it is common practice to allow certain types of libraries into the artifacts repository but block them from the build or from the product environment. The way to achieve policy enforcement is to create a different product for each phase of the SDLC.
For an example of how to do this, see Use Case 3: Managing Policies for Different Stages in the SDLC.
Roles and Permissions
All users are allowed to view the policies in the scopes to which they have access permissions.
The following role permissions are required to create, edit or delete policies, according to their policy level:
Global organization policies: Global Admin role
Organizational policies: ORG Admin role
Project and product policies: Product Admin or Admin roles
NOTE: A Product Admin has higher permissions than an ORG Admin, as project and product policies are the first policies that WhiteSource will look at for a match.
Managing Policies
Organizational policies are managed via the Policies menu item from the main menu.
In the Policies page, you can view, add, edit, change the priority of, enable/disable, and remove policies.
Product-level policies are available for products that want to set their own policies which override the organizational ones. Product policies are managed from the product page, under the Policies button.
Creating a New Policy
To create a new WhiteSource policy, do as follows:
In the Policies page, click the Add Policy button. The Add Policy page is displayed.
Match your policy to a library. From the Match drop-down list, select the library type to which you want to match the policy.
Specify the action to be performed on the matched library. In the Action section, click the action you want to apply to the library.
Click the Add button to revert to the Policies page showing the newly-created policy.
If required, you can reorder the policy according to priority by selecting it and clicking the Raise Priority/Lower Priority buttons.
NOTES:
You can apply newly created policies to requests by clicking Apply to Requests. This action will apply them only to requests, and not to approved inventory items.
If there are new libraries that do not match a policy and the Open tasks for new libraries check box (Integrate tab > Advanced Settings) is selected, a new task will be created for the Default Approver.
By clicking Apply to Existing Inventory, you can apply newly created policies that have been assigned the Approve, Reject or Issue actions, to the existing inventory.
Updating a Policy
To update a policy, do as follows:
In the Policies page, select the policy you want to update and click the edit link.
Edit your policy by library match, action, and priority, as required. For details, see Creating a New Policy.
Enabling/Disabling a Policy
If you have a policy that you do not want to match with any library but you don’t want to delete it in case you need it at a future date, you can temporarily disable the policy.
To disable a policy, select the relevant policy in the Policies page, and click the disable link.
To enable a policy, select it and click the enable link.
Deleting a Policy
To delete a policy, do as follows:
In the Policies page, select the relevant policy and click the remove link. A confirmation dialog box opens.
Click OK to confirm the deletion.
Policy Use Case Examples
The following use case examples illustrate how you can use WhiteSource policies to test the security of your open source code after scanning it.
Use Case 1: Library Approval/Rejection Workflow
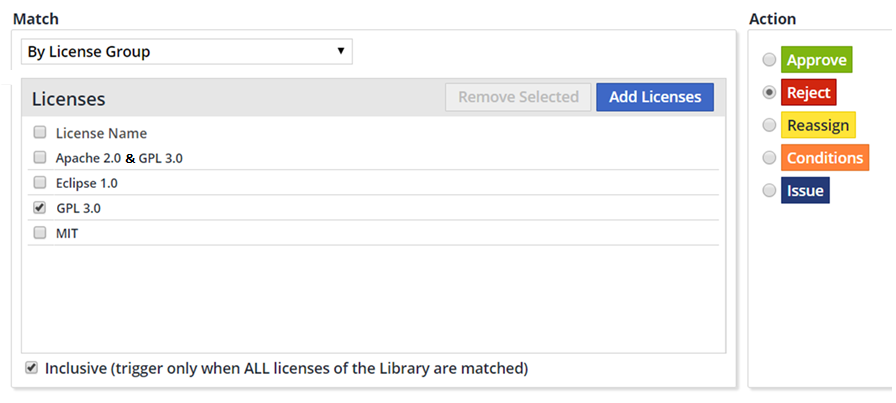
This use case will show how not to apply a policy that refers to a specific license if the library has a double license which includes the specific license. For example, how to reject libraries with GPL only but allowing those with GPL and Apache.
NOTE: As a library can have more than one license, you can choose to trigger the policy’s action when any of the licenses match those defined in the policy, or when all of the licenses match them.
The following screenshot provides an example:
Do as follows:
From the Policies page, under Match, select By License Group and click Add Licenses. A list of license names will be displayed. If a license does not exist in this list, the policy will not apply.
From the list, select GPL.
If you want to trigger the policy’s action only when all of the licenses of the library match those defined in the policy, select the checkbox Inclusive (trigger only when ALL licenses of the library are matched).
Under Action, select the Reject radio button.
Click Add to go back to the Policies page.
In the Policies page, click Save to save the new policy.
As a result, libraries that have only GPL licenses will be automatically rejected. The user will get notification of the rejection and these libraries will not be added to their repository.
Libraries that include GPL with multiple other licenses will not be rejected. These libraries will be automatically combined with the security tests of the user’s one source code.
Use Case 2: Ticket Creation Workflow
WhiteSource policies can integrate with Ticket Management Systems (such as JIRA or Work Items), enabling the automatic creation of tickets for tracking issues externally to WhiteSource. When vulnerabilities are found in the user’s code that development needs to fix, a ticket is automatically created in the issue tracker with all related information. All relevant developers will automatically receive a task in JIRA to resolve the issue.
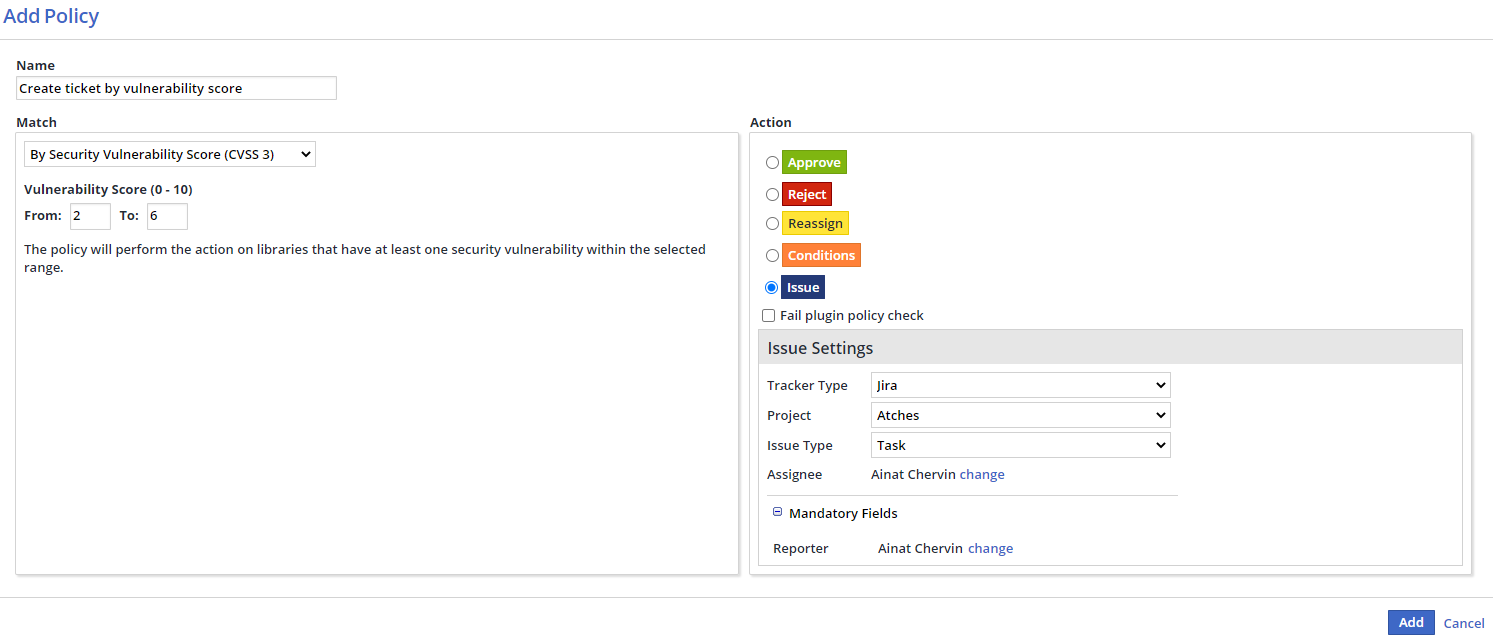
This use case provides an example of a ticket creation flow from the time a high-security vulnerability (as defined by the NVD) is discovered when scanning the user’s open source library code. This high security vulnerability needs to be fixed in the user’s code. An Issue policy is created and a ticket is automatically created in the JIRA issue tracker.
The following screenshot provides an example:
To create an issue in JIRA that can be managed externally to WhiteSource, do as follows:
In the Admin Console, create the required policy and select the Issue action.
Select the Fail plugin policy check check box if you want to fail the scanned policies that have the Reject action type according to the Unified Agent configuration, before they are uploaded to the WhiteSource server.
Configure the JIRA credentials in the Issue Settings:
Select the Tracker Type as JIRA.
Select the Jira Project for the issue.
Select the Issue Type (e.g. Task or Bug).
Change the Assignee if required.
NOTE: If the issue type in the project requires mandatory fields, those fields are displayed and must be filled in. Currently supported fields are Reporter, Labels, Categories and Parent.
In the Jira itself, the issue will describe the level and match type of the policy, including the organization, product and project which the library belongs to. Additional information will also be displayed that helps to identify why this library matched the policy (in this example, since the policy match type was High Severity Vulnerability, the vulnerability severity and link appears).
After resolving the issue, the Security officer can check that the risk was mitigated.
Use Case 3: Managing Policies for Different Stages in the SDLC
In cases where different policies are required for different stages of the software development lifecycle, it is common to allow certain types of libraries into the artifact repository but block them from the build or from the production environment.
This example illustrates how you can accomplish tiered policy enforcement by creating a different WhiteSource product for each phase of the SDLC. For example, say you have an ERP product that uses an artifact repository to store its open source components, a CI (build) server to continuously run team builds, and a CI server build for deployment - you can use WhiteSource policies to govern each of these products differently.
The following steps are required to do this:
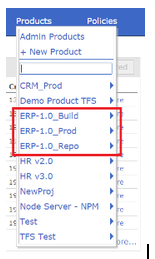
Creating the Products
First, create a product for each environment: ERP-1.0_Repo, ERP-1.0_Build and ERP-1.0_Prod. This is what it should look like in the portal:
Mapping the Products to the SDLC Stages
Once the products are created, you can integrate each of them with the relevant step of the SDLC. In our example:
ERP-1.0_Repo will be connected to a repository plugin (Artifactory, Nexus, GitHub, etc.).
ERP-1.0_Build will be connected to the CI/Build environment (Jenkins, TeamCity, VSTS, etc.).
ERP-1.0_Prod will be connected to the production version (e.g. Docker but could also simply be the CI build job that generated the production version).
All of these connections can (and should) be done with WhiteSource native plugins.
Setting Up the Policies
The next step is to create distinct sets of policies for each product. These policies will then be automatically enforced in the corresponding tools during the different steps of the SDLC. In our example:
ERP-1.0_Repo will reject only high-severity security vulnerabilities and blacklist GPL type licenses. It will whitelist all the rest and allow them into the repository:

ERP-1.0_Build is more restrictive on security vulnerabilities and will not automatically accept old libraries:

ERP-1.0_Prod will not accept any vulnerable components and will double-check that no GPL licensed libraries snuck in somehow:

Enforcing the Policies
The way these policies are enforced is also different in each step of the SDLC. In the artifact repository, artifacts that do not comply with the policy will not be allowed to enter the repository and will not be accessible to the developers that use it. In the CI/Build tool, there are two ways to enforce the policies: either fail the build or launch a workflow around it and notify the relevant individuals.
Best Practices
This section covers some basic best practices for automated policies.
As described previously, your WhiteSource Inventory is intended to be an accurate representation of your open source liabilities - both from security and legal perspectives. In order to remediate appropriately, it is important to control which libraries are approved and which are rejected.
As a general rule, WhiteSource promotes the shift-left strategy which preempts the introduction of problematic dependencies long before they reach the build stage, using Advise for Chrome/Edge, IDE integrations: Intellij, Eclipse, Visual Studio, and GitHub/GitLab integrations. However, policies are an equally powerful last defense against introducing recently discovered vulnerabilities into your code.
Policies
The following policies best practices are listed in order of importance:
Reject libraries with vulnerabilities.
Any vulnerability can be exploited, so we cannot recommend a “minimum level.” You will need to decide for yourself how to set this, but you can always start with High Severity vulnerabilities and create policies down the line for less severe vulnerabilities.
Consult with a legal expert and reject any licenses that are too restrictive.
Again, while we cannot provide legal advice, Risk Scores are available for a subset of licenses - determined by legal experts that specialize in open source compliance, so that is a good place to start!
Enable tasks to ensure that any new libraries which are introduced are subject to manual review, if they are not resolved by the existing policies. And then…
Create a group(s) of users as necessary that should review the tasks and assign the these users to the relevant Products (via Product>
 >Product Default Approvers) . These groups should be restricted to personnel with the authority to make decisions, such as security experts, managers or team leaders. The more you delegate to reviewers, the more visibility you will have, resulting in fewer neglected tasks. Groups are more easily administered and as such, they are more highly recommended than individual user assignments.
Consult with a legal expert and approve any licenses that are deemed permissible. This will help to resolve any tasks for new libraries.
Ensure that the order of your policies correctly reflect the Priority you require. The higher the policy on the list, the higher the priority. A library will be subject to the first policy it matches.
Establish organization-level policies and only use product and project-level policies where there are exceptions, to limit complexity.
“Issue” policies at the product or project-level that create JIRA or Work Item tickets can be assigned to the relevant team in your organization. This allows you to seamlessly integrate remediation tasks into your development process.
Unified Agent
The Unified Agent is a Java command-line tool that scans directories' open source components for vulnerable libraries and source files, as well as license compliance, and uploads the results to the WhiteSource web application.
For a detailed explanation of the Unified Agent's configuration parameters, please refer to the Policies section in Unified Agent Overview.
The following best practices are recommended for configuring parameters in the Unified Agent:
checkPolicies=true will return an exit code for any Reject actions. This is great for a production CI/CD pipeline, right after the build stage when all the dependencies have been installed but before the deployment step. If the policies check fails, it will return an Exit Code. NOTE: Enabling the Fail plugin policy check on a Reassign, Conditions, or Issue policy action will extend the exit code behavior to non-Reject actions.
forceCheckAllDependencies=true will check all dependencies including dependencies in your inventory with known dependencies. While this is a best practice, it can be difficult to implement in reality because it means any violation will return an exit code, which can disrupt a build. NOTE: This parameter needs to be enabled in conjunction with checkPolicies=true.
updateInventory=false is a good setting to use for non-production builds (for example, dev) because it allows you to test your feature branches against your policies without creating projects in the UI.