| Table of Contents | ||
|---|---|---|
|
Overview
Mend Advise for Eclipse is a powerful software plug-in for the Eclipse IDE. It makes critical information available directly from within the IDE, and provides developers with information on security vulnerabilities reported for their open-source libraries in their projects. It leverages Mend’s vast database and analysis power, and its automatic vulnerability checking facilitates quick remediation.
Mend Advise for Eclipse's intuitive design provides the following:
Details on reported security vulnerabilities are featured in familiar Eclipse tabs
Expanded information is displayed on-demand by hovering a mouse pointer over a component with reported vulnerabilities
The reference in the pom.xml/build.gradle to a component reported to have a security vulnerability is automatically marked in the IDE
Mend Advise for Eclipse works quickly and unobtrusively in the background, enabling earlier vulnerability awareness, better vulnerability handling, and faster vulnerability remediation.
Support for Languages and Package Managers
Mend Advise for Eclipse supports Java with the Maven and/or Gradle package managers.
NOTE: Gradle Kotlin projects are not supported in Mend Advise.
Prerequisites
Ensure the following:
A valid license for Mend for Developers
A license key for Mend Advise for IDE, available via one of the following options:
If you do not have direct access to the Mend Application, obtain the license key from your Mend Administrator.
If you have access to the Mend Application, do as follows (NOTE: This option is only available when using version 20.11.1 or later of Mend Advise):
Go to the Mend Application.
Open the Profile page.
In the Mend Advise - IDE Integration section at the bottom, select your organization.
Copy your personal license key to be used later in Activating Mend Advise.
Java JDK 1.8 and up (see here for instructions) or OpenJDK 1.8 and up is installed
Either or both of the following:
Apache Maven Application is installed and the Maven path and all environment variables are set up (see here for instructions)
Gradle is installed
Eclipse is installed and you are familiar with its basic functionality.
When declaring a gradle.properties file, ensure it is declared in the project's top-level folder.
Proxy settings
Mend Advise for Eclipse supports proxy settings (Networks Connections sections of the setting). Note, that only HTTPS proxy is supported.
Supported Versions
The plugin supports Eclipse 2018-09 and above. The last tested version is 2021-12.
Installing Mend Advise
To install Mend Advise, do as follows:
NOTE: If you previously installed the Mend Advise plugin using the dropin folder, you must delete the org.whitesource.eclipse.plugin jar file from the dropin folder before performing this procedure.
Start Eclipse, specifying the preferred workspace.
From the menu bar, select Help > Eclipse Marketplace. The Eclipse Marketplace screen is displayed.
In the Search tab, in the Search box, enter Mend and press Enter from your keyboard. The Mend Advise plugin information is displayed.
Click Install.
Read and accept the license agreement's terms, and click Finish.
In the pop-up message, click Restart Now.
Activating Mend Advise
To activate Mend Advise, do as follows:
Start Eclipse, specifying the preferred workspace.
From the menu bar, select Mend > Mend Advise Login. The Welcome to Mend Advise dialog box is displayed.
In email, enter your organizational email (the email domain must be licensed to use Advise).
In License Key, enter your license key (See here for more information on how to obtain a license key).
Click Login.
...
Configuring Mend Advise
| Info |
|---|
Changes made to the Mend settings will only apply after running the next scan. |
To configure Mend Advise, do as follows:
...
Select Mend.
...
In the Mend screen, review the options and modify if necessary. See here for a list of all options.
...
Click Apply and Close.
Options Table
...
Option
...
Description
...
Default Setting
...
Only show issues for direct dependencies
...
When enabled, Mend Advise will only return vulnerabilities for direct dependencies defined in your dependency file.
...
Unselected (not checked)
...
Minimum vulnerability severity level
...
Alert only on detected vulnerabilities satisfying a Low/Medium/High minimum severity level.
Low - Vulnerability alerts for all severities (Low, Medium, High) are displayed.
Medium- Vulnerability alerts only for Medium or High severities are displayed.
High - Vulnerability alerts only for High severities are displayed.
...
Low
Scanning Projects for Security Vulnerabilities
Automatically Scanning Projects
Once you have activated Mend Advise, it automatically scans Maven/Gradle projects for open source security vulnerabilities whenever such projects are opened or built. The scan results are displayed in the Markers tab and a dedicated Mend tab. There is no way of disabling automatic scanning.
Manually Scanning Projects
To manually scan a project, do as follows:
Select one or multiple projects in Eclipse.
Do one of the following options:
From the menu bar, select Mend > Scan Project with Mend Advise
From your keyboard, click Ctrl + 6 (Windows Only)
From the top toolbar, click the Mend icon
From the Project Explorer pane, right-click a project (or a selection of projects) and select Scan Project With Mend Advise from the context menu
Reviewing Scan Results
Scan results are displayed in the following areas:
The Eclipse Marker tab, displaying important analysis information
The Mend tab, displaying extended scan results information
Refer to the following sections.
Reviewing Analysis Results in the Markers Tab
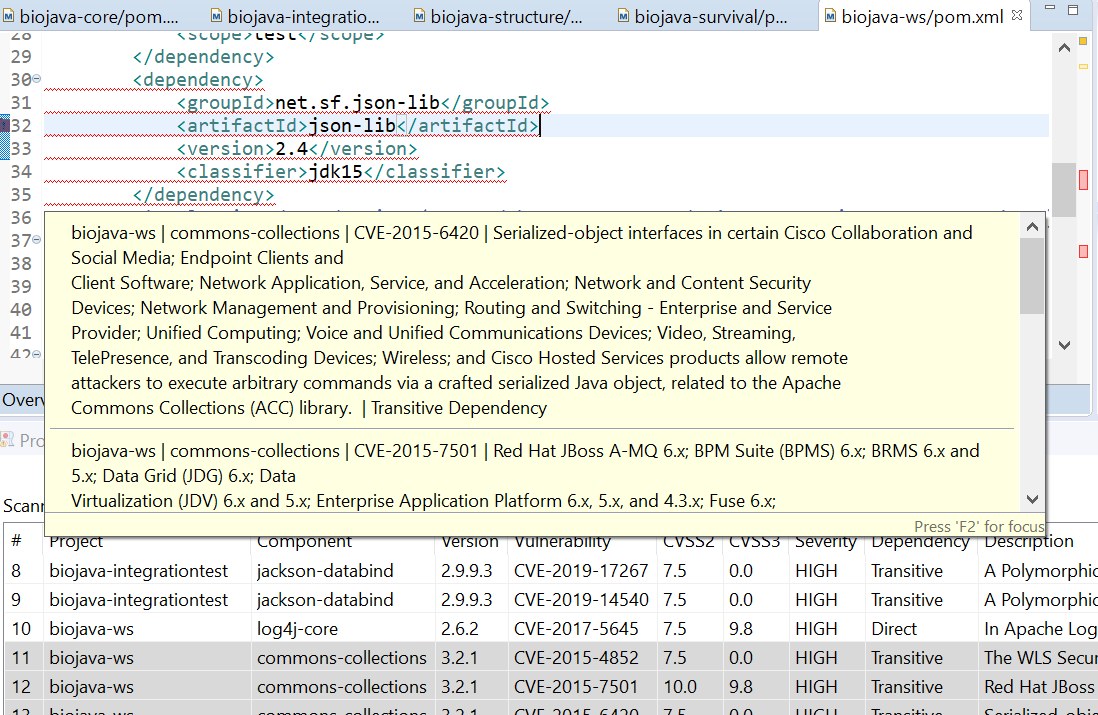
The Markers tab lists information regarding Eclipse projects including problems and tasks, and important details on Mend vulnerability scan results. Those results are categorized and grouped according to their severity (High, Medium and Low) under designated rows (e.g., Mend Scan – High Severity) that can be expanded and collapsed to display more information on each vulnerability.
Scan results are featured in the following Markers columns:
Description - Details of the vulnerability, such as project, vulnerable component, vulnerability ID, vulnerability description, and dependency type
Resource - Referenced project dependency file (pom.xml/build.gradle)
Path - Project path
Location - Line in the code representing the relevant vulnerability
NOTE: Hovering the mouse pointer over a long entry will display its details in an informative tooltip.
To review scan results in the Markers tab, do as follows:
Click the Markers tab, if it is not the active tab.
Expand a severity category to view a detailed listing of all the vulnerabilities grouped within.
In the expanded severity category, hover with the mouse over a given vulnerability to display additional information.
NOTE: Additional security vulnerability details are found in the Mend tab, in the Description column.
Reviewing Analysis Results in the Mend tab
The Mend tab expands on the vulnerability details listed in the Markers tab. The tab features the following columns:
Project - The scanned project where a vulnerability was found
Component - The scanned component reported to have a vulnerability
Version - The version of the scanned component reported to contain a vulnerability
Vulnerability - The identifier of the vulnerability. Clicking the identifier (link) opens the Mend Vulnerability Lab providing more information.
CVSS 2 - The security vulnerability's Common Vulnerability Scoring System (CVSS) 2 score
CVSS 3 - The security vulnerability's Common Vulnerability Scoring System (CVSS) 3 score
Severity - Reported severity for the vulnerability: High, Medium, Low
Dependency type - Whether the vulnerable component is a Direct dependency (as defined directly in the pom.xml/build.gradle file) or a Transitive dependency
Description - The description of the security vulnerability
To sort the displayed Mend Advise results based on a preferred column, click the corresponding column header.
Additionally, the tab lists general statistics regarding the scan, as follows:
NOTE: These statistics concern the plugin's most recent scan only.
Scanned projects - The total count of projects scanned
Last scan timestamp - The time the scan began
Security vulnerability scan summary - The number of High, Medium, and Low severity vulnerabilities in the scan, plus the total number of vulnerabilities
Displaying Vulnerability Information for a Scanned Component
Mend Advise enables you to view valuable information on open source security vulnerabilities and enables you to easily highlight code regarding such vulnerabilities. This section describes how Mend Advise can be used to display security vulnerability details for a project, in Eclipse's main code view.
Click the Mend tab and do as follows:
...
To quickly locate the component referenced by a reported vulnerability in the project’s pom.xml/build.gradle, double-click the security vulnerability in the Mend tab. The referenced component description in the pom.xml/build.gradle will be displayed and highlighted in a window view.
...
To quickly review the list of vulnerabilities reported for a component in the pom.xml/build.gradle view, hover the mouse pointer over the Mend Advice severity icon displayed to the left of a component. A tooltip will be displayed, featuring details (per vulnerability) including identifier (e.g., CVE), severity, and a fix suggestion if available.
...
(For Maven projects only) To quickly display an analysis summary for a component in the pom.xml view, hover the mouse pointer over the code for the component in that view; a tooltip will be displayed, featuring both information and (depending on vulnerability attributes) links for applicable options, as follows:
Jump to location: Changes the display to a view featuring the component’s definition
Fix for: (applicable only to vulnerabilities in direct dependencies) Updates the component’s version pom.xml field with the number of the earliest version that according to Mend features a fix to the security vulnerability.
Restoring the Mend Tab
If the Mend tab is closed, you can re-open it as follows:
From the menu bar, select Window > Show View > Other. The Show View dialog box is displayed.
Open the Mend folder, and select Mend.
Viewing General Plugin Information
To view version information about Mend Advise, do as follows:
From the menu bar, select Mend > About Mend Advise.
The Mend Advise screen displays information about the Advise plugin's version and copyright, along with links for Privacy policy and Terms and Conditions.
Upgrading Mend Advise
To upgrade the Mend Advise plugin, do as follows:
Start Eclipse, specifying the preferred workspace.
From the menu bar, select Help > Eclipse Marketplace. The Eclipse Marketplace screen is displayed.
Click the Installed tab.
Scroll for the Mend Advise plugin.
Click Update.
Read and accept the license agreement's terms, and click Finish.
In the popup message, click Restart Now.
Uninstalling Mend Advise
Uninstalling Mend Advise will remove the plugin and its components only from the current workspace.
To uninstall from the current workspace:
From the menu bar, select Help > About Eclipse IDE > Installation Details. The Eclipse IDE Installation Details dialog box is displayed.
In the filter text field at the top, enter Mend, and click Enter.
Select Mend Advise.
At the bottom, click Uninstall. The Uninstall Details dialog box is displayed.
Review and click Finish.
If you are prompted to restart, do so.
In order to remove Mend Advise from additional workspaces, do as follows per workspace:
In Eclipse, open the workspace.
Install Mend Advise for that workspace, as per the instructions above.
Uninstall Mend Advise for that workspace, as per the instructions above. This will remove all the relevant Mend components from that workspace.
Known Issues
Installing the Plugin on Multiple Eclipse Versions
The Eclipse plugin will not work for users who first installed it on a 2019-xx version of the Eclipse IDE, and who then installed the plugin on a 2018-xx (or earlier) version of the Eclipse IDE. This problem exists due to the following circumstances:
All Eclipse installations share the same secure storage
2018-xx (or earlier) versions of the Eclipse IDE use a 32-bit password provider, while 2019-xx versions use a 64-bit password provider.
In such circumstances, users might receive a corresponding error message stating that Eclipse “couldn't store authentication details”.This page is available at: https://docs.mend.io/bundle/integrations/page/mend_advise_for_eclipse.html