| Table of Contents |
|---|
Overview
This procedure describes how to integrate Mend Unified Agent with Artifactory Docker registries.
NOTE: Before you begin, make sure that the relevant package manager is installed. For details, see This page is available at: https://whitesourcedocs.atlassianmend.netio/wiki/spaces/WD/pages/1140852201/Getting+Started+with+the+Unified+Agent#Prerequisites .
Docker Artifactory Access Methods
There are three access methods.
Repository Path – No reverse proxy needed. Available from Artifactory 5.8 and up.
Sub-domain – Needs a reverse proxy.
Port – Needs a reverse proxy.
Repository Path
Overview
From version 5.8. Artifactory has introduced a new method referred to as the "Repository Path" method, since it uses the Docker repository path prefix (<REPOSITORY_KEY/IMAGE>) to access a specific Artifactory Docker registry from the Docker client. Note that you may still have a reverse proxy configured for Artifactory for other reasons; however, when configured to use the Repository Path method, requests to Docker registries in Artifactory will be handled by Artifactory's embedded Tomcat instead of the reverse proxy.
Using the Repository Path method, you can work with Artifactory as a Docker registry without a reverse proxy on an insecure connection (i.e. only HTTP is supported, not HTTPS).
Refer here for additional information.
Step 1: Artifactory Configuration
Prerequisites
Admin user credentials
Ensure Artifactory is up and running, and is activated with a valid license.
Configuration
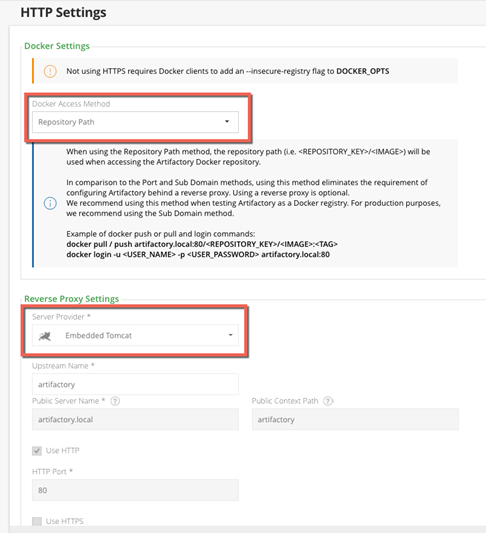
Go to the HTTP Settings screen from the Admin module under Configuration > HTTP Settings.
In the Docker Settings panel, select Repository Path as the Docker Access Method.
In the Reverse Proxy Settings panel, select Embedded Tomcat as the Server Provider (indicating you are not using a reverse proxy).
Step 2: Docker Configuration
NOTE: Running $ docker info will list the Insecure registries that have been applied under the Insecure Registries entry.
For HTTP URLs, configure the Docker client to work with an insecure registry as described in the Docker documentation.
Restart your Docker engine to apply the insecure registry flag.
Step 3: Testing Your Setup
The following code snippets assume you have a virtual Docker repository named docker-virtual that contains ‘hello-world:latest’ image in Artifactory test.Mendsoftwaretest.com on port 8081.
Verify that your Docker client can access Artifactory by running the following command (ensure that the return code is 200):
Code Block $ curl -I -k -v http://test.Mendsoftwaretest.com:8081/artifactory/api/system/pingProceed to test your Docker registry. First, login to Artifactory as your Docker registry.
Code Block $ docker login -u admin -p password test.Mendsoftwaretest.com:8081Pull the "hello-world" image from the docker-virtual repository.
Code Block $ docker pull test.Mendsoftwaretest.com:8081/docker-virtual/hello-world:latestList all Docker repositories hosted in under an Artifactory Docker repository. For example, using ‘docker-virtual’ repository:
Code Block $ curl -u <user>:<password> -X GET "http://test.Mendsoftwaretest.com:8081/artifactory/api/docker/docker-virtual/v2/_catalog“(The following API requires admin user credentials only.) Rest API retrieves the reverse proxy configuration:
Code Block $ curl -u <user>:<password> -X GET "http://test.Mendsoftwaretest.com:8081/artifactory/api/system/configuration/webServer“
Step 4: Unified Agent Configuration
docker.scanImages=true
docker.pull.enable=true
docker.artifactory.enable=true
docker.artifactory.url= http/s://<artifactory hostname>:<artifactory port>/<context path>
# Example: docker.artifactory.url=http://test.Mendsoftwaretest.com:8081/artifactory
docker.artifactory.userName=<user name>
docker.artifactory.userPassword=<user password>
docker.artifactory.repositoriesNames=<repositories names separated by space>
#docker.artifactory.repositoriesNames=docker-virtual docker-local docker-remote
docker.artifactory.dockerAccessMethod=repopath // (optional for admin user)
Subdomain
Overview
Regarding the subdomain method, you only need to configure your reverse proxy once. From then on, the mapping from Docker commands to Docker registries in Artifactory is dynamic and requires no further modification of your reverse proxy configuration.
Jfrog Artifactory recommends using the subdomain method since it will require a one-time effort to configure a reverse proxy, while in the port method you should configure a reverse proxy for each new repository.
Step 1
Prerequisites
Admin user credentials
Ensure Artifactory is up and running, and is activated with a valid license.
Esure you have a reverse proxy server up and running.
Obtain a wildcard SSL certificate or use a wildcard self-signed certificate. Ensure your certificate matches the Artifactory hostname used in your reverse proxy configuration.
Configuration
Go to the HTTP Settings screen from the Admin module under Configuration > HTTP Settings.
Use the correct Artifactory hostname in the Public Server Name field.
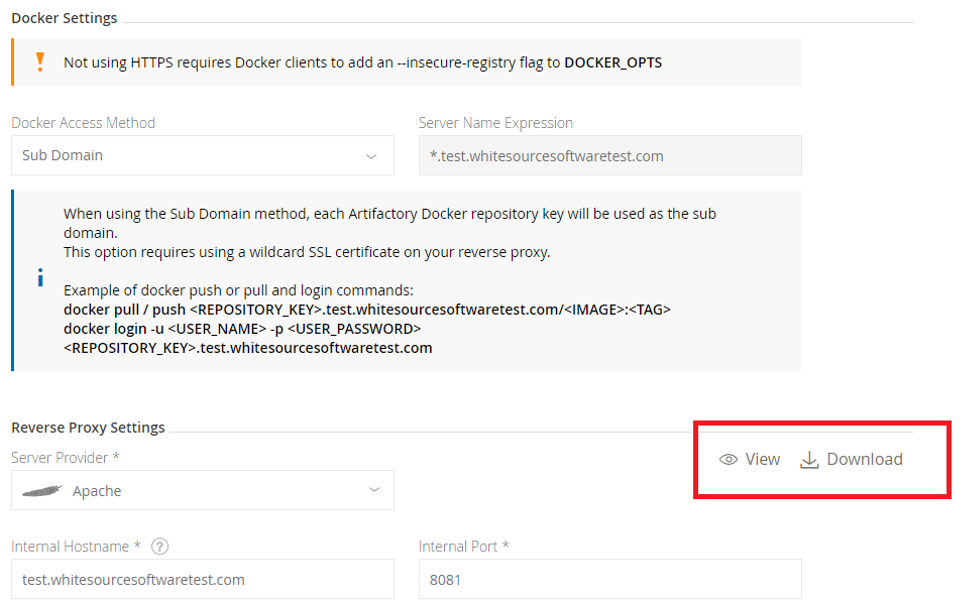
Select Subdomain as the Reverse Proxy Method under Docker Reverse Proxy Settings.
NOTE: The following screenshot assumes that artifactory hostname is test.Mendsoftwaretest.com.
...
Step 2: Reverse Proxy
Take Reverse Proxy Configuration Snippet from Configuration > HTTP Settings > Reverse Proxy Settings from view or download (as in the accompanying screenshot).
Place the configuration file in the right place under your reverse proxy server installation
Reload the reverse proxy server.
IMPORTANT: If your reverse proxy server was not installed, first follow these instructions here and here.
Step 3: Docker Configuration
Let’s assume we have a docker registry named docker-virtual artifactory server on IP 172.19.231.225 and the artifactory hostname is test.Mendsoftwaretest.com.
...
Add the following to your DNS or to the client's /etc/hosts file: <ip-address> <artifactory-hostname> <repository-key>. <artifactory-hostname>
...
If you use a secured artifactory server (using HTTPS), then there is no need to complete this procedure - simply continue to the next procedure.
...
Configure the Docker client to work with an insecure registry as described in the Docker documentation.
...
Restart your Docker daemon/engine to apply the insecure registry flag.
...
Running $ docker info will list the Insecure registries that have been applied under the Insecure Registries entry.
Step 4: Testing Your Setup
The following code snippets assume you have a virtual docker repository named docker-virtual that contains ‘hello-world:latest’ image in image in Artifactory test.Mendsoftwaretest.com on port 8081.
Verify that your Docker client can access Artifactory by run the following command (ensure that the return code is 200):
Code Block z$ curl -I -k -v http://test.Mendsoftwaretest.com:8081/artifactory/api/system/pingLogin to Artifactory as your Docker registry:
Code Block $ docker login -u admin -p password docker-virtual.test.Mendsoftwaretest.com:8081Pull the "hello-world" image from the docker-virtual repository:
Code Block $ docker pull docker-virtual.test.Mendsoftwaretest.com: 8081/hello-world:latestList all Docker repositories hosted in under an Artifactory Docker repository. For example, using ‘docker-virtual’ repository:
Code Block $ curl -u <user>:<password> -X GET "http://test.Mendsoftwaretest.com:8081/artifactory/api/docker/docker-virtual/v2/_catalog“(The following API requires admin user credentials only) Rest API retrieves the reverse proxy configuration:
Code Block $ curl -u <user>:<password> -X GET "http://test.Mendsoftwaretest.com:8081/artifactory/api/system/configuration/webServer“
Step 5: Unified Agent Configuration
docker.scanImages=true
docker.pull.enable=true
docker.artifactory.enable=true
docker.artifactory.url= http/s://<artifactory hostname>:<artifactory port>/<context path>
# Example: docker.artifactory.url=http://test.Mendsoftwaretest.com:8081/artifactory
docker.artifactory.userName=<user name>
docker.artifactory.userPassword=<user password>
docker.artifactory.repositoriesNames=<repositories names separated by space>
#docker.artifactory.repositoriesNames=docker-virtual docker-local docker-remote
docker.artifactory.dockerAccessMethod=subdomain // (optional for admin user)
Port
Overview
With the ports method, a port number is mapped to each Artifactory Docker registry. While this is an easy way to start, you will need to modify your reverse proxy configuration and add a new mapping for each new Docker registry you define in Artifactory. In addition, firewalls and other restrictions by your IT department may restrict port numbers, therefore making the ports method not feasible.
Step 1: Artifactory Configuration
Prerequisites
Admin user credentials
Ensure Artifactory is up and running, and is activated with a valid license.
Ensure you have a reverse proxy server up and running.
Obtain an SSL certificate or use a self-signed certificate that can be generated.
NOTE: Ensure your certificate matches the Artifactory hostname used in your reverse proxy configuration.
Configuration
Go to the HTTP Settings screen from the Admin module under Configuration > HTTP Settings.
Use the correct Artifactory hostname in the Public Server Name field.
Select PORT as the Reverse Proxy Method under Docker Reverse Proxy Settings.
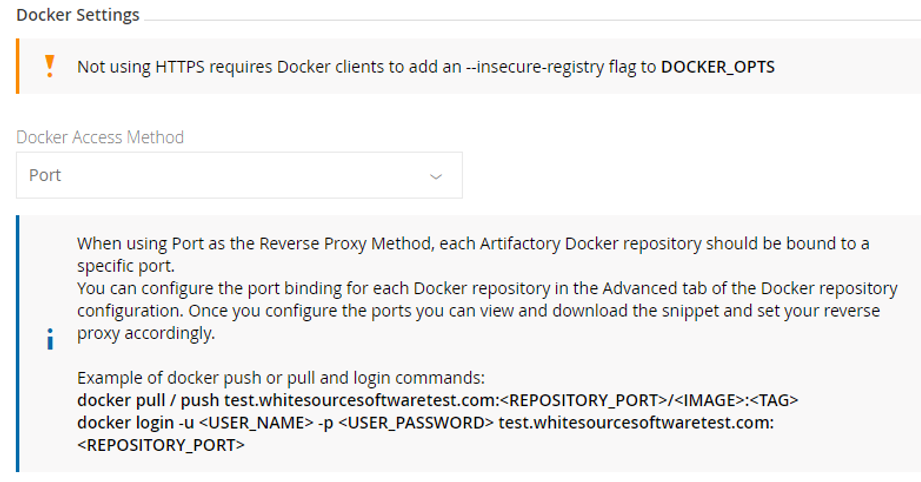
If you select Port as the Reverse Proxy Method, when configuring a Docker Repository, you will need to set the Registry Port in the Docker Repository Configuration Advanced tab. Together with the Public Server Name, this is the port that the Docker client will use to pull images from and push images to the repository.
Note that in order for all of your Docker repositories to be included in your reverse proxy configuration, you first need to set the port for each Docker repository defined in your system, and only then generate the reverse proxy configuration. Note also that each repository must be bound to a unique port.
...
Step 2: Reverse Proxy
Configure the reverse proxy only when you finish configuring the port for all artifactory docker repositories
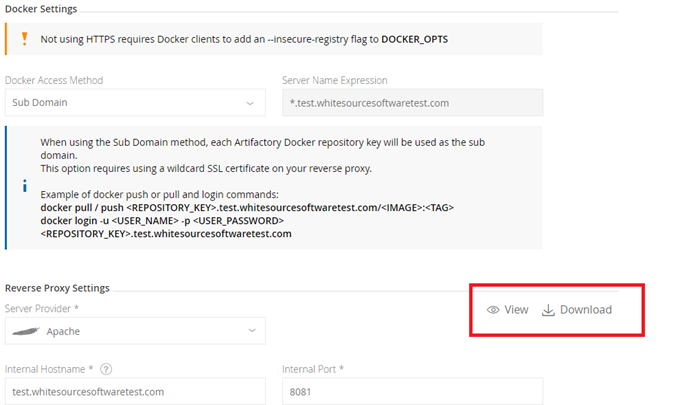
Take the Reverse Proxy Configuration Snippet from Configuration > HTTP Settings > Reverse Proxy Settings from view or download (as in the image).
Place the configuration file in the right place under your reverse proxy server installation.
Reload the reverse proxy server.
IMPORTANT: If your reverse proxy server was not installed, first follow these instructions here and here.
Step 3: Docker Configuration
Let’s assume we have the artifactory server on IP 172.19.231.225 and the artifactory hostname is test.Mendsoftwaretest.com.
Add the following to your DNS or to the client's /etc/hosts file: <ip-address> <artifactory-hostname>
Verify that the Hosts file contains the line: “172.19.231.225 test.Mendsoftwaretest.com”
If you use secured artifactory server (using HTTPS) then there is no need to complete this procedure - simply continue to the next procedure.
Configure the Docker client to work with an insecure registry as described in the Docker documentation.
Restart your Docker daemon/engine to apply the insecure registry flag.
Running $ docker info will list the Insecure registries that have been applied under the Insecure Registries entry.
Step 4: Testing Your Setup
Verify that your Docker client can access Artifactory by run the following command (ensure that the return code is 200):
Code Block $ curl -I -k -v http://test.Mendsoftwaretest.com:8081/artifactory/api/system/pingThe following commands use docker-virtual registry port 6556 instead of artifactory server port since we are using the PORT access method.
Login to Artifactory as your Docker registry.
Code Block $ docker login -u admin -p password test.Mendsoftwaretest.com:6556Pull the "hello-world" image from the docker-virtual repository.
Code Block $ docker pull test.Mendsoftwaretest.com :6556/hello-world:latestList all Docker repositories hosted in under an Artifactory Docker repository. For example, use the ‘docker-virtual’ repository:
Code Block $ curl -u <user>:<password> -X GET "http://test.Mendsoftwaretest.com:8081/artifactory/api/docker/docker-virtual/v2/_catalog“(The following API requires admin user credentials only). Rest API retrieves the reverse proxy configuration; verify that the repositories' ports appear and have correct values:
Code Block $ curl -u <user>:<password> -X GET "http://test.Mendsoftwaretest.com:8081/artifactory/api/system/configuration/webServer“
Step 5: Unified Agent Configuration
...
docker.scanImages=true
...
docker.pull.enable=true
...
docker.artifactory.enable=true
...
# docker.artifactory.url= http/s://<artifactory hostname>:<artifactory port>/<context path>
...
docker.artifactory.url=http://test.Mendsoftwaretest.com:8081/artifactory
...
docker.artifactory.userName=<user name>
...
docker.artifactory.userPassword=<user password>
...
docker.artifactory.dockerAccessMethod=subdomain // (optional for admin user)
...
# docker.artifactory.repositoriesNames=<repositories names separated by space>
...
# If user is ‘read-only’ user then you must add each repository port as <repo-name>:<repo-port> (optional for admin user)
...
docker.artifactory.repositoriesNames=docker-virtual docker-local docker-remote
...
# for read-only user, Its optional for admin user to add repository port:
...
bundle/unified_agent/page/docker_artifactory_integration.html