| Table of Contents |
|---|
...
Overview
WhiteSource Issue Tracker enables you to create an issue in a ticketing system according to a policy you defined in the WhiteSource application. Currently, WhiteSource supports integrations with Jira Cloud, Jira Server (starting v 8.5.4) and and Work Items.
NOTE: WhiteSource has created a new ability to integrate with issue tracking systems; refer here for details.
Jira Integration
Entering Your Jira Credentials
...
After scanning a project matching the policy you created in the above steps, go to your Jira account. The new issue will be displayed.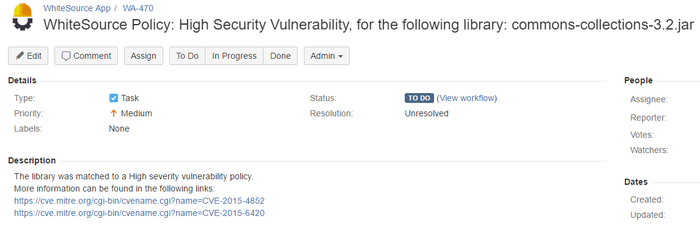
Note: The CVE links are displayed only if there are applicable CVE records that have been verified by the NVD.
Work Items Integration
Entering Your Work Items Credentials
...
- Go to your Azure DevOps account.
- Click the profile button and select Security.
- Click Personal Access Tokens.
- Click New Token.
- In Create a New Personal Access Token, do as follows:
- In Name, enter WhiteSource Integration.
- In Organization, select your organization.
- In Expiration, select your preferred expiration date.
- In Scopes, select Full access.
- Click Create.
- In the Success screen, copy the personal access token (for use later in this procedure).
- Click Close.
- In WhiteSource, click Admin to go to Organization Administration.
- In Integration, click Issue Tracker Settings.
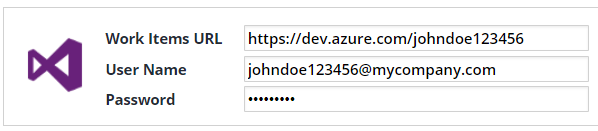
- Enter your Work Items URL and User Name. In Password, enter (paste) the token that you created previously in this procedure.
- Click Save.
...
- Go to your Azure DevOps account.
- Click the profile button and select Security.
- Click Alternate credentials.
- Select the Enable alternate authentication credentials checkbox and create a password.
- Click Save.
- In WhiteSource, click Admin to go to Organization Administration.
- In Integration, click Issue Tracker Settings.
- Enter your Work Items URL and User Name and enter the password that was created in the above steps.
- Click Save.
...