| Table of Contents | ||
|---|---|---|
|
Overview
This page describes how to integrate Mend’s open-source management platform with AVM platforms. These integrations enable you to view information about the security vulnerabilities of open source components and synchronize auditing informational decisions. A dashboard is provided that displays a summary view of the vulnerability assessment for the relevant deployment.
The following steps describe how the Mend Agent integrates Mend's open-source management platform with an AVM platform:
The Mend Agent retrieves the Mend vulnerability alerts reports for the user's Mend products and projects and sends these reports to the AVM platform. Only descriptive information regarding the projects or products is sent.
Once configured, updates are performed on the AVM platform according to a predefined schedule. Mend products and projects reports are displayed as application reports in the AVM dashboard.
Based on the customer's preferences, the audit information is updated in Mend or the AVM platform to reflect the most recent status of the alerts.
For example, Mend alerts could become false positive or suspended alerts in AVM, and vice versa.
After the integration has completed, all Mend vulnerability alerts reports of open-source software in an organization will be continuously and automatically synchronized with Mend and the relevant AVM platform. The selected Mend products and projects will be updated to the relevant applications on the AVM platforms.
Details about the configuration of specific AVM platforms are described in the following pages:
Setting Up ThreadFix Application Vulnerability Management (AVM) Platform
Setting Up Fortify Application Vulnerability Management (AVM) Platform
Mapping Mend Entities to an AVM Application
During integration, the AVM Agent searches for the Mend projects and products that were mapped to the specific AVM platform's applications. The Mend Agent takes the mapping and synchronizes the vulnerability alerts between Mend and the AVM platform. If any vulnerability alerts were generated for the mapped Mend products and projects, the corresponding applications from the AVM platform will be updated.
You can create a mapping between Mend entities and the AVM application as follows:
Manually using explicit AVM application name and version in the product and project AVM.application.name and AVM.application.version tags
Automatically using the “*” symbol inside the tags
Using HTTP API scripts and cURL requests
Creating a Mapping Using Tags
In order to map Mend products and projects to the AVM platform applications, you can manually add specifically-defined (Avm.) products/project tags, as follows:
For each product that you want to synchronize with the AVM application, add the following product tags (for details, see Adding Product Tags):
...
Key: AVM.application.name
Value: Name of AVM application to sync, or "*" to reuse the same name as the Mend product
...
For each project that you want to synchronize with the application, add the following project tags (for details, see Adding Project Tags):
Key: AVM.application.name
Value: Name of AVM application to sync, or "*" to reuse "WS Product name\WS Project name" as the name of the applicationKey: AVM.application.version
Value: Name of AVM application version to sync. If no version tag is presented, the default version 1.0 will be used.
For example:
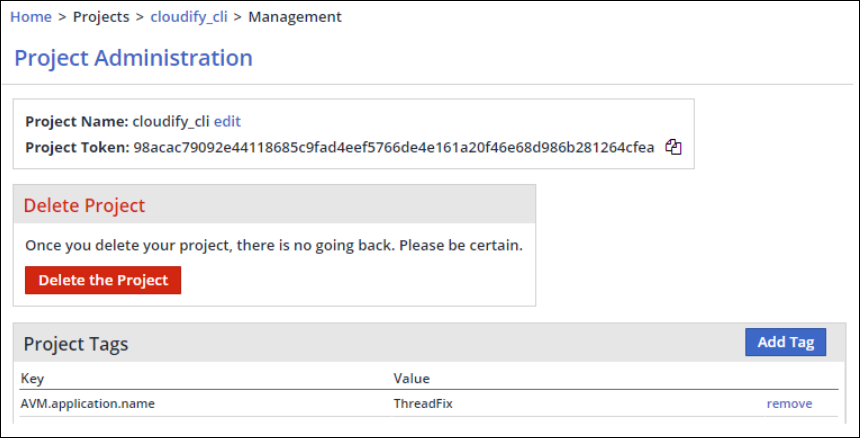
To map a specific Mend project to an AVM application:
From the Project Administration page in the Mend Web-UI, add a new project tag and define the corresponding AVM application name in the Mend project tag, as shown here:
NOTES:
Tags names are case sensitive (that is, they must be AVM.application.version and AVM.application.version)
If there are no applications in the AVM platform, they will be created if the avm.application.sync configuration parameter is set to true. See Configuration File & Parameters.
On Windows operating systems, the values for AVM.application.name and AVM.application.version do not support the following:
Special characters: / : * ? " < > |
All non-printable characters such as NULL, TAB, ESC, etc.
It is assumed that there is a 1:1 relationship between an application name in the AVM platform and the product/project name in Mend. If the same AVM application name is mapped to multiple projects/products, only one of them will be synchronized to the AVM platform.
Using APIs to Map Multiple Mend Products or Projects to AVM Applications
The mapping process enables AVM users to automate the setting of AVM-related tags to multiple projects and products in Mend, by using APIs.
To map projects in Mend to an AVM application, project tags API requests are used.
To map products in Mend to an AVM application, product tags API requests are used.
Setting Project Tags
Send a POST request with the following parameters:
| Code Block |
|---|
{
"requestType" : "saveProjectTag",
"projectToken" : "${projectToken}",
"userKey": "${userKey}",
"tagKey":"${tagName}",
"tagValue":"${tagValue}"
} |
where:
projectToken is the token of the project that will get the new tag.
userKey is the Mend User key.
tagKey is the tag name, for example: AVM.application.name
tagValue is the value of the tag, for example: TestProject
The following cURL example sends a request to the Mend SAAS server to synchronize the AVM application to a Mend project:
| Code Block |
|---|
curl --request POST \
  --url https://saas.whitesourcesoftware.com/api/v1.1 \
  --header 'content-type: application/json' \
--data '{ "requestType" : "saveProjectTag", "projectToken" : "${projectToken}", "userKey": "${userKey}", "tagKey":"AVM.application.name", "tagValue":"TestValue"}' |
The response should be:
| Code Block |
|---|
{
"projectTagsInfo":{"name":"${NameOfProject}","token":"${projectToken}","tags":{"AVM.application.name":"TestValue"}}
} |
where NameOfProject is the name of the Mend project that was updated.
Setting Product Tags
Send a POST request with the following parameters:
| Code Block |
|---|
{
"requestType" : "saveProductTag",
"productToken" : "${productToken}",
"userKey": "${userKey}",
"tagKey":"${tagName}",
"tagValue":"${tagValue}"
} |
where:
productToken is the token of the product that will get the new tag.
userKey is the Mend User key.
tagKey is the tag name, for example: AVM.application.name
tagValue is the value of the tag, for example: TestProduct
The following Python example sends a request to the Mend SAAS server to synchronize the AVM application to a Mend product:
| Code Block |
|---|
import http.client
conn = http.client.HTTPSConnection("saas.whitesourcesoftware.com")
payload = "{\n    \"requestType\" : \"saveProductTag\",\n    \"productToken\" : \"${productToken}\",\n    \"userKey\": \"${userKey}\",\n    \"tagKey\":\"${tagName}\",\n    \"tagValue\":\"${tagValue}\"\n}"
headers = {
    'content-type': "application/json",
    }
conn.request("POST", "/api/v1.1", payload, headers)
res = conn.getresponse()
data = res.read()
print(data.decode("utf-8")) |
The response should be:
{ "productTagsInfo": { "name": "${NameOfProduct}", "token": "${productToken}", "tags": { "${tagName}": "${tagValue}" } } }
where NameOfProduct is the name of the Mend product that was updated.
Get All Products
Send a getAllProducts POST request with the following parameters:
cURL example:
| Code Block |
|---|
curl -X POST \
  https://saas.whitesourcesoftware.com/api/v1.1 \
  -H 'content-type: application/json' \
  -d '{
    "requestType" : "getAllProducts",
    "orgToken" : "${orgToken}",
    "userKey": "${userKey}"
} |
where orgToken is the unique API key of the organization.
A successful response with all products should be:
| Code Block |
|---|
{
    "products": [
        {
            "productId" : "product_a_id",
            "productName": "Product A",
            "productToken": "product_a_token"
        },
        {
            "productId" : "product_b_id",
            "productName": "Product B",
            "productToken": "product_b_token"
        }
    ],
    "message": "Success"
} |
Get All Projects of a Product
Send a getAllProjects POST request with the following parameters:
cURL example:
| Code Block |
|---|
curl -X POST \
  https://saas.whitesourcesoftware.com/api/v1.1 \
  -H 'content-type: application/json' \
  -d '{
    "requestType" : "getAllProjects",
    "productToken" : "${productToken}",
    "userKey":"${userKey}"
}' |
A successful response with all projects will be:
| Code Block |
|---|
{
    "projects": [
        {
            "projectId" : "project_a_id",
            "projectName": "Project A",
            "projectToken": "project_a_token"
        },
        {
            "projectId" : "project_b_id",
            "projectName": "Project B",
            "projectToken": "project_b_token"
        }
    ],
    "message": "Success"
} |
Configuring the AVM Agent
The configuration of the AVM Agent can be done by:
Creating a configuration file that provides all related parameters and points to the file while running the Agent. The Mend Agent's configuration file and its supported parameters can be downloaded from: whitesource-avm-agent.config.
-Or-
Setting configuration parameters in the command line.
To configure the AVM Agent, do the following:
Download the Jar file.
Create a text file with the name whitesource-avm-agent.config or download it and place it in the same directory as the Jar file.
Edit the file or run the Agent with the minimal set of parameters to allow end-to-end integration.
Alternatively, run the Agent while setting the minimal mandatory set of parameters in the command line.
Following are the minimal parameters that must be set in the command line:
...
Parameter
...
Description
...
wss.url
...
The wss.url parameter must point to the Mend HTTP API URL.
Retrieve the 'Mend Server URL' which you can copy from the Integrate page on the Server URLs panel.
Then, add the /api path to the URL. (e.g., url=https://<domain>.whitesourcesoftware.com/api).
For example: https://saas.whitesourcesoftware.com/api/v1.3. For more information, refer to HTTP API v1.3 .
...
wss.apiKey
...
Unique identifier of the organization. It can be retrieved from the Admin page in your Mend account GUI.
...
wss.userKey
...
Unique user identifier. It can be generated from the Profile page in your Mend account GUI.
...
avm.name
...
Name of the AVM application.
...
AVM platform connectivity parameters:
...
avm.url
...
URL for your Application Vulnerability Management Server.
...
api key as defined in the AVM application’s account OR username and password for your Application Vulnerability Management Server.
Command Line Parameters
...
Parameter
...
Type
...
Description
...
Required
...
Default
...
-c (only CLI)
...
String
...
Configuration file name (including file path)
...
No
...
Mend-avm-agent.config
...
wss.apiKey
...
String
...
Unique identifier of the organization. It can be retrieved from the Admin page in your Mend account GUI.
Old name: apiKey
...
Yes
...
No default value
...
wss.url
...
String
...
Mend HTTP API entry point.
Old name: url
...
No
...
No default value
...
wss.userKey
...
String
...
Unique user identifier. It can be generated from the Profile page in your Mend account GUI.
Old name: userKey
...
Yes
...
No default value
...
generateOfflineReport
...
Boolean
...
Whether to perform the scan in offline mode and generate a zip file for each product/project in your Mend organization.
No
...
false
...
force_sync
...
Boolean
...
Whether to synchronize all products/projects or only updated products/projects.
When the value is false, synchronize only data in these cases:
A new Unified Agent scan on the project/product.
A new alert was found on a dependency that exists in the project/product.
A new major version was found on a dependency that exists in the project/product.
The alert status was changed manually in the application.
...
No
...
true
...
wss.proxy
...
String
...
A proxy that should be used to connect HTTP platform, overwrites proxy parameter below.
...
No
...
No default value
...
fromDate
...
String
...
Fetch vulnerability alerts from Mend from the specified date.
...
No
...
No default value
...
toDate
...
String
...
Fetch vulnerability alerts from Mend until the specified date.
...
No
...
No default value
...
wss.connectionTimeout
...
Integer
...
Mend connection timeout is measured in milliseconds.
Old name: connectionTimeout
...
No
...
Default value is 120,000 milliseconds.
...
-requestFiles (only CLI)
...
String
...
Provide comma-separated list of absolute paths to generated by offline requests.
This action uploads the offline request file(s) to AVM platform.
...
No
...
No default value
...
MendFolderPath
...
String
...
Path to the Mend folder. This folder is created when retrieving the vulnerability alerts report in offline mode. The path can either be absolute or relative.
Only CLI for now
...
No
...
Default value is the folder from which the agent is running
...
synchronizeFrom
...
String
...
The direction of alerts status synchronization.
If the value is set to WS:
Alerts (WS) → False Positive Alerts
Alerts (WS) → Suppressed Alerts
If the value is set to AVM:
False Positive Alerts → Alerts (WS)
Suppressed Alerts → Alerts (WS)
...
No
...
AVM
...
avm.application.sync
...
Boolean
...
If enabled, the specified applications are created in AVM. Includes all the products/projects in Mend that have the tag "AVM.application.name". This will also create the application versions according to the "AVM.application.version" in Mend.
If disabled, no applications will be created on AVM.
...
No
...
true
...
avm.name
...
String
...
The AVM application name.
...
Yes
...
Fortify
...
avm.url
...
String
...
API base URL for your application vulnerability management server.
For example: "https://threadfix.example.com:8080/threadfix".
...
No
...
No default value
...
avm.apikey
...
String
...
api key as defined in the AVM application’s account.
...
No, if avm.user and avm.pass are set.
...
No default value.
See https://denimgroup.atlassian.net/wiki/spaces/TDOC/pages/22619214/API+Keys
...
avm.user
...
String
...
Username for your application vulnerability management server
...
No if avm.apiKey is defined
...
No default value
...
avm.pass
...
String
...
User's password for your application vulnerability management server
No, if avm.apiKey is defined
...
No default value
...
threadfix.team.name
...
String
...
Name of team to add applications (ThreadFix only)
...
No
...
No default value. If left empty, WS organization name will be used to create a new team.
...
avm.proxy
...
String
...
A proxy that should be used to connect the AVM platform; overwrites the proxy parameter below.
...
No
...
Format protocol://<user>:<password>@host\:port/
...
avm.connectionTimeout
...
Integer
...
AVM connection timeout measured in milliseconds.
...
No
...
50,000 milliseconds.
...
avm.pluginName
...
Engine name at your application vulnerability management server.
...
No
...
No
...
include_avm_applications
...
String
...
Enables including AVM applications to be synchronized.
Value format should be a comma-delimited regular expression.
For example:
include_avm_applications = *Dev.* includes all AVM application names that contains this sub string.
For example: projectDev, Dev1, …..If the parameter isn’t set or has an empty value, it will include all AVM applications.
...
No
...
No default value
...
exclude_avm_applications
...
String
...
Enables excluding AVM applications to be synchronized.
Value format should be a comma-delimited regular expression.
For example:
exclude_avm_applications = *Dev.* excludes all AVM application names that contains this sub string.
For example: projectDev, Dev1, …..If the parameter isn’t set or has an empty value, it will not exclude any AVM applications.
When both include_avm_applications & exclude_avm_applications are populated, the system will first apply the include REGEX and then the exclude REGEX.
...
No
...
No default value
...
-deleteAlerts (only CLI)
...
String
...
Deletes the Artifact History from AVM for the specified applications.
Enter a comma-separated list of applications as they are displayed in the Mend GUI (case-sensitive).
Entering "*" removes all Artifact History and AVM Issues from AVM for all Mend generated applications.
...
No
...
No default value
...
-deleteApplications (only CLI)
...
String
...
Deletes all specified applications from AVM. Enter a comma-separated list of applications as they appear in Mend (case-sensitive). Entering "*" removes all Mend generated applications from AVM.
Note: Before deleting an AVM application, make sure that all of its issues are deleted.
...
No
...
No default value
...
proxy
...
String
...
HTTP Proxy to use by Agent. Could be overwritten by avm.proxy and/or wss.proxy
...
No
...
Format protocol://<user>:<password>@host\:port/
...
-h (CLI only)
or
-help
...
String
...
Provides an explanation of all parameters.
...
No
...
logLevel
...
String
...
Define the debug level for logs. Options are INFO and DEBUG.
Example: -logLevel DEBUG
Optional values: ALL, DEBUG, INFO, WARN, ERROR, OFF
...
No
...
INFO
Note: Almost all command line parameters match configuration file parameters (the exclusions are explicitly listed in the table above). Use "-" + parameter
Configuration File & Parameters
The Mend Agent’s configuration file and its supported parameters can be downloaded from here: whitesource-avm-agent.config.
Running the AVM Agent
Best Practices
The following best practices are recommended:
Mend recommends setting the avm.application.sync parameter value to true. This is preferable for initial and scheduled setup as it automatically synchronizes AVM with each product/project defined in your Mend organization.
It is advisable to run a cron-based job once a day to receive vulnerability alerts via the HTTP API of the organization and then push the output to AVM.
When setting up the Offline mode, update the whitesource-avm-agent.config file by changing the generateOfflineReport property value to true.
When uploading an Offline Request file, upload via the command line, as follows:
Execute the AVM Agent with the -requestFiles flag specifying the path to the WS_<application-name>_@_<application-version>_@_<scan-date_time>.<extension> file(s) you created in the previous step. In order to send more than one file, separate file names with a comma.
java -jar /path/to/jar/whitesource-avm-agent-*.jar -requestFiles <full-file-path1>[,<full-file-path2>]
Adding Proxy Settings: Use the CLI parameter -proxy to set proxy settings.
The following command allows you to download a remote configuration file using proxy settings:
java -jar /path/to/jar/whitesource-avm-agent-<x.x.x.>.jar -c "path/to/config/file/in/remote" -proxy protocol://<user>:<password>@host\:port/
For example: java -jar /path/to/jar/whitesource-avm-agent-<x.x.x.>.jar -c "https://some.url/whitesource-avm-agent.config" -proxy http://hm:hm@192.168.1.233:808/
NOTE: The following protocols are supported: file://, ftp://, http://, https://
Use Case Examples
Following are some use cases showing syntax examples for running the Mend->AVM platform integration:
Running a cron job
cronjob.shCode Block #!/bin/sh java -jar /full/path/to/jarfile/whitesource-avm-agent-19.7.1.jar -c "/full/path/to/configfile/whitesource-avm-agent.config"When running a cron job:
Provide execute permissions for both the configuration and Jar files.
You must specify the full path of the Jar and script files.
You can use the command line parameters documented on this page.
Example of a crontab entry for running daily at 2:15pm:15 14 * * * /path/to/cron/cronjob.sh </dev/null > /path/to/logs/output.txt 2>&1
Running the Jar from the command line. If you want to place the configuration file in a different folder, then you can specify its path as follows:
java -jar /path/to/jar/whitesource-avm-agent-19.7.1.jar -c /path/to/config/fileRunning the Agent with an 'apiKey' value from the command line instead of the configuration file:
java -jar /path/to/jar/whitesource-avm-agent-19.7.1.jar -avm.apiKey your-api-keyRunning the Agent in offline mode and specifying the directory of the output files:
java -jar /path/to/jar/whitesource-avm-agent-19.7.1.jar -c /path/to/config/file -generateOfflineReport true -whiteSourceFolderPath /path/to/output/folderIf the whitesourceFolderPath was not specified, then a folder named 'Mend' is created in the current folder.
Running the Agent in offline mode and specifying the start and end date (format in example is 'yyyy-MM-dd'):
java -jar /path/to/jar/whitesource-avm-agent-19.7.1.jar -c /path/to/config/file -generateOfflineReport true -fromDate 2019-01-22 -toDate 2019-09-25Running the Agent with the requested files that were created in offline mode in order to be uploaded to AVM. If a value for 'whitesourceFolderPath' was provided, then the file names must be relative to the provided folder path.
java -jar /path/to/jar/whitesource-avm-agent-19.7.1.jar -whitesourceFolderPath /path/to/output/folder -requestFiles [<relative-file-path1>,<relative-file-pathRunning the Agent with proxy parameters from the command line instead of the configuration file:
java -jar /path/to/jar/whitesource-avm-agent-19.7.1.jar -proxy.host your-proxy-host-name -proxy.port your-proxy-port-number -proxy.user your-proxy-usernameAllow downloading and using a configuration file from remote locations as well:
java -jar /path/to/jar/whitesource-avm-agent-19.7.1.jar -c <protocol>://user:password@example.com:8080/The following protocols are supported: file://, ftp://, http://, https://.
Allow downloading and using the configuration file from remote locations with proxy:
java -jar /path/to/jar/whitesource-avm-agent-<x.x.x.>.jar -c path/to/config/file/in/remote -proxy <protocol>://<user>:<password>@host:port/
The following protocols are supported: file://, ftp://, http://, https://.Removing the reports 'sample1' and 'sample2':
java -jar whitesource-avm-agent-19.7.1.jar -c "whitesource-avm-agent.config" -deleteAlerts "sample1,sample2"Removing all reports:
java -jar whitesource-avm-agent-19.7.1.jar -c "whitesource-avm-agent.config" -deleteAlerts "*"Removing the applications 'demo1' and 'demo2':
java -jar whitesource-avm-agent-19.7.1.jar -c "whitesource-avm-agent.config" -deleteApplications "demo1,demo2"Removing all applications:
java -jar whitesource-avm-agent-19.7.1.jar -c "whitesource-avm-agent.config" -deleteApplications "*"
It is possible to delete both applications and reports (alerts) via the same command as displayed in the following example:
java -jar whitesource-avm-agent-19.7.1.jar -c "whitesource-avm-agent.config" -deleteAlerts "sample1,sample2" -deleteApplications "demo1,demo2"
Synchronizing Alerts Statuses between Mend and the AVM Platform
The status of alerts is defined in the WhiteHouse Alerts report (see The Alerts Report). Alerts can have the status of active, ignored, or restored.
Starting from Version 19.11.1, AVM can synchronize the Alerts' status with the corresponding status of alerts in AVM platforms in a bi-directional manner.
To initialize the synchronization process of alerts' statuses, set the synchronizeFrom parameter in the whitesource-avm-agent.config file (see Configuration File & Parameters), and indicate the direction of synchronization. The default direction is from AVM to Mend (#synchronizeFrom=WS).
NOTE: If you anticipate a large number of alerts that must be synchronized, enlarge the volume of memory directed to the Java process using the -Xmx flag, according to the following measurements:
1G → 8,500 alerts
2G → 11,000 alerts
4G → 14,500 alerts
For example:
-Xmx2G indicates that when the maximum heap size is set to 2GB, 11,000 alerts can be processed.is available at: https://docs.mend.io/bundle/integrations/page/integrating_mend_with_an_application_vulnerability_management__avm__platform.html