| Table of Contents |
|---|
Overview
This
...
The Azure DevOps Pipelines native integration is enabled via the Mend for Azure DevOps extension. It enables you to do the following:
Detect and remediate vulnerable open source components
Generate a comprehensive open-source inventory report per build
Enforce open source license compliance, including dependencies’ licenses
Identify outdated open-source libraries with recommendations to update
NOTES:
The extension maps an Azure DevOps Organization to a specified Mend Organization.
The extension maps an Azure DevOps Project (and all of its pipelines which are integrated with Mend) to a specified Mend Product. In order to map between an Azure DevOps Pipeline Build and a Mend Product, it is recommended to use the Unified Agent integration.
Support for Languages and Package Managers
The Azure DevOps integration supports programming languages and package managers that are supported today by the Unified Agent.
Note the following current limitations:
Docker image scanning is not supported
Effective Usage Analysis capabilities are not supported
Prerequisites
Ensure the following:
...
Your Azure DevOps organization is connected to an Azure AD via Organization Settings > Azure Active Directory.
...
An activation key for this Azure DevOps integration is available via the Mend application's Integrate tab.
...
The New Version alerts setting is enabled via Admin > Alert Settings. When disabled, no information is displayed in the Outdated Libraries tab of the Open source risk report.
...
If you are using a self-hosted build agent, note that running it behind a web proxy is not currently supported.
...
The relevant package manager used by your project is installed.
...
page is available at: https://
...
...
...
Installing the Extension
To install the extension, do as follows:
Click here. The Mend for Azure DevOps page is displayed.
Click Get and follow the installation procedure.
Activating the Extension
To activate the extension, do as follows:
To re-activate the extension using a different Mend account (activation key), uninstall the extension and then follow the instructions below.
After installing the extension, navigate to Organization Settings > Extensions > Mend within your Azure DevOps organization.
An activation form for connecting to your Mend account is displayed. Enter the following details:
First name
Last name
Work email
Company name
Country
Activation key - navigate to Integrate > Azure DevOps Integration in the Mend application. Click the Generate Activation Key, and copy-paste the activation key. NOTE: If you are not a Mend administrator, you will need to get the activation key from the administrator.
Click Connect Account. Your extension is now connected to your Mend account.
Configuring Organizational Settings
After completing the activation process, you can define the Mend mapping resolution; whether to map each Azure DevOps pipeline to a Mend project (which is the default behavior) or to map each run/build of the pipeline to a Mend project. This setting will be applied to all of your organization’s pipelines.
To define the Mend mapping resolution, do as follows:
Navigate to Organization Settings > Extensions > Mend.
Select the Map Azure DevOps Pipelines to Mend Projects checkbox if you want each Azure DevOps pipeline to be mapped to a Mend project (by default, it is selected).
-Or-
Clear the checkbox to map only each run/build of the pipeline to a Mend project.Click Save.
Configuring Project Settings
The default Mend Product that will be associated with your specific Azure DevOps Project, is AZDO_<PROJECT_NAME>. To change the mapped Mend Product, there are two available options:
Defining a New Mend Product
To define a new Mend product to be created and associated with your Azure DevOps project, do as follows:
Ensure that you followed the procedures in Activating the Extension.
Navigate to your Azure DevOps Project.
Navigate to Project Settings > Extensions > Mend of the specific project.
Enter the desired Mend product name in the Product name field. As you enter the name, it will simultaneously appear under the input field; click that name below.
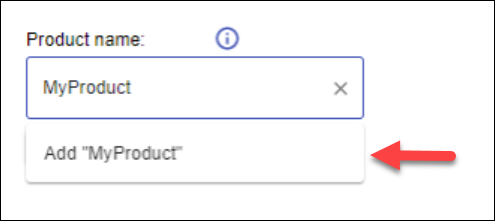
In the Add a new Product dialog box, click Add.
Under the Product name box click Save.
The new product will be created in the Mend application. Any build that will run in the specific Azure DevOps project will have results appear in the Mend application under the provided product name.
Selecting a Product From a List of Existing Mend Products
To select a product from a list of existing Mend products, do as follows:
Ensure that you followed the procedures in Activating the Extension.
Navigate to your Azure DevOps Project.
Navigate to Project Settings > Extensions > Mend.
Click the input field of the Product name to display the list of the existing Mend products.
Select a product from the list. Once selected, it should be displayed in the input field. Click Save.
Any build that will run in the specific Azure DevOps project will have results appear in the Mend application under the provided existing Mend product.
Existing Mend scans that were triggered before changing the Mend product name will remain under the previously-set Mend product.
Adding a Mend Build Task to Your Pipeline
After completing the relevant settings, all is set for adding a Mend build task to the pipeline. Do as follows:
Go to the relevant Azure DevOps project for which you want Mend to run.
Inside your Azure DevOps project, from the sidebar, click Pipelines. The Pipelines page is displayed.
Click the relevant pipeline. The specific pipeline page is displayed.
Click Edit. Do one of the following procedures:
This activates the Mend integration on your build pipeline.
NOTE: Adding a pre-step build task is not necessary in order for Mend to successfully scan the build repository. Mend by default runs a pre-step command as part of the Mend task.
Adding a Build Task to a YAML Pipeline
In the pipeline edit page, from the right side, click Show assistant. The Tasks sidebar is displayed.
In the search bar, enter Mend. The Mend task is displayed.
Click the Mend task.
From the bottom right corner, click Add. The Mend task is added to the pipeline.
Code Block - task: WhiteSource@21(Optional) To specify the name of the Mend project to be created, add the following to the Mend task. In the following example, replace
New_Project_Namewith the name you want to give your Mend project:
NOTE: When the Overwrite projects with latest build data checkbox from the Organization Settings > Extensions >Mend is selected, you will be unable to change the project name after the first build run.Code Block - task: WhiteSource@21 inputs: cwd: '$(System.DefaultWorkingDirectory)' projectName: 'New_Project_Name'(Optional) To specify custom Unified Agent Configuration parameters, add all parameters in the Mend Configuration field (ensure each parameter along with its value are provided on a separate line). In the following example, under
configuration, provide all relevant parameters.
NOTE: The parameters used here overwrite the default configuration parameters. Configuration parameters that were not provided will use the default values as described here.Code Block - task: WhiteSource@21 inputs: cwd: '$(System.DefaultWorkingDirectory)' configuration: | npm.resolveDependencies=true maven.resolveDependencies=trueClick Save & queue.
NOTE: The Mend task can be moved to other locations within the steps section, depending on your preferences.
Adding a Build Task to a Classic Pipeline
To add a task to the Agent Job, click the plus (“+”) sign next to the agent job section. The Add Tasks section is displayed.
In the search bar, enter Mend. The Mend task is displayed.
Click the Mend tab, and then click Add. The Mend task is added to the pipeline.
(Optional) To specify the name of the Mend project to be created, enter the name in the Project name field.
NOTE: When the Overwrite projects with latest build data checkbox from Organization Settings > Extensions > Mend is selected, you will be unable to change the project name after the first build run.(Optional) To specify custom Unified Agent Configuration parameters, add all parameters in the Mend Configuration field (ensure each parameter name along with its value are provided on a separate line).
NOTE: The parameters used here overwrite the default configuration parameters. Configuration parameters that were not provided will use the default values as described here.Click Save & queue.
NOTE: The Mend task can be moved to other locations within the steps section, depending on your preferences.
Azure DevOps Integration Default Settings
The default settings of the Azure DevOps integration are different from the Unified Agent Configuration Parameters and are derived from the Unified Agent Configuration Parameters for Native Integrations except for the following parameters:
Includes/Excludes Glob Patterns
excludes=**/*sources.jar **/*javadoc.jar **/tests/**
Viewing the Mend Report
The Mend report comprises of four tabs: Inventory, Outdated Libraries, Security Vulnerabilities, and License Risks. You can view the Mend report by following these steps:
Ensure that you followed the procedures in Activating the Extension and Adding a Mend Build Task to Your Pipeline.
Go to the specific build’s results page for your project, and click the Mend tab. The Mend open-source Risk Report is displayed.
Understanding the Report
...
Security Summary
A summary of detected open source vulnerabilities and the libraries that contain them.
...
Name
...
Description
...
Vulnerability Risk
...
The overall risk level for your inventory. Can be High, Medium, Low, No Risk.
...
Vulnerable Libraries
...
Displays the total number of vulnerable libraries.
...
Severity Distribution
...
Provides a breakdown of the vulnerabilities according to their severity level.
Inventory Tab
An inventory of all the detected open source libraries.
...
Name
...
Description
...
Library
...
The name of the open-source library linking to the Library Details page in the Mend application.
...
Licenses
...
Lists licenses detected for each library, and links to their license descriptions.
Outdated Libraries
Libraries that have not been updated to their newest available versions.
...
Name
...
Description
...
Library
...
The name of the outdated library, linking to the Library Details page in the Mend application.
...
Your version
...
The version number of the outdated library.
...
Newest stable version
...
The library’s most up-to-date version number.
Security Vulnerabilities
A table listing all security vulnerabilities.
...
Name
...
Description
...
Severity
...
The severity of the vulnerability. Consists of:
Severity level- H (high), M (medium), L (low).
CVSS score
...
Vulnerability
...
The vulnerability identifier linking to the Mend vulnerability lab, containing more information.
...
Date
...
The vulnerability publish date.
...
Library
...
The name of the open-source library containing the vulnerability, linking to the Library Details page in the Mend application.
...
Top Fix
...
The top-rated remediation advice that Mend recommends for each vulnerability. A condensed description of the recommended course of action is given, followed by a link to a broader description.
License Risks
The License Risk Table displays a summary of open-source components’ license types and their associated risk including the number of occurrences.
...
Name
...
Description
...
License
...
The license detected as part of the inventory linking to its license description.
...
Risk
...
The risk associated with the license. Values are H (high), M (medium), L (low). In case of unknown risk, no risk is displayed.
...
Occurrences
...
In how many libraries this license occurs.
Additionally, the following charts are displayed:
...
The License Distribution chart displays the distribution of licenses across the inventory.
...
io/bundle/integrations/page/azure_devops_pipelines_integration.html