| Table of Contents |
|---|
Overview
This page describes how to integrate TeamCity with the Unified Agent.
Prerequisites
Before you begin, do as follows:
Install TeamCity on your machine.
Install TeamCity Agent in order to be able to start builds.
Make sure that the relevant package manager is installed. For details, see https://whitesource.atlassian.net/wiki/spaces/WD/pages/1140852201/Getting+Started+with+the+Unified+Agent#Prerequisites.
Setup via Windows PowerShell
1. In TeamCity, click Administration.
2. Click Create Project.
3. In Create Build Configuration, select Manually for workspace on a local or a Github/repository via URL in case you have a project on GitHub. Enter the missing fields and click Create.
...
4. Click +Create Build Configuration, enter a suitable name it and click + Create build configuration. This step moves to the New VCS Root window.
5. In the left pane, click the Build Steps section, and then click +Add build step: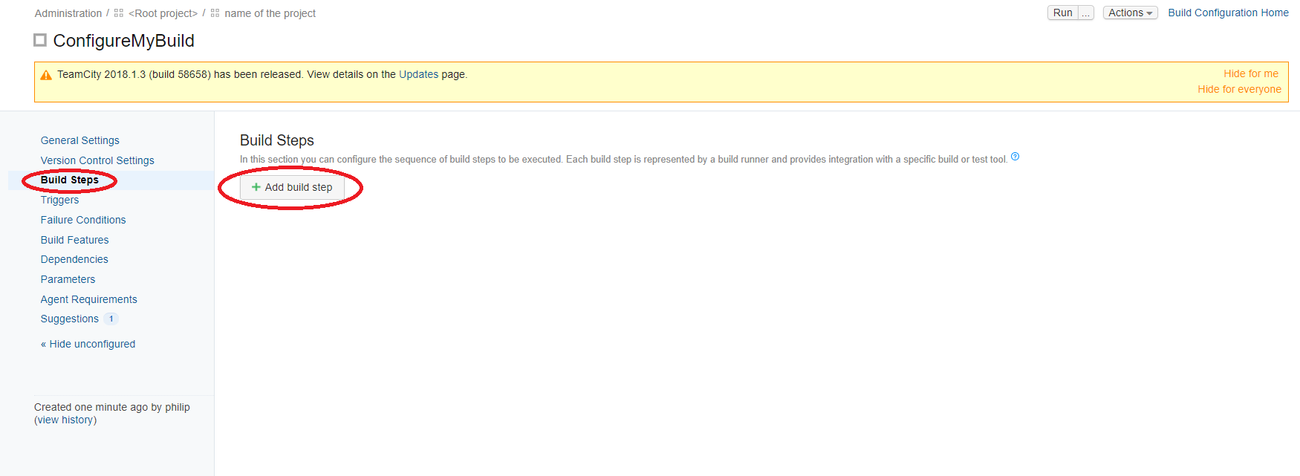
6. Select PowerShell as Runner type, and Source code as the Script: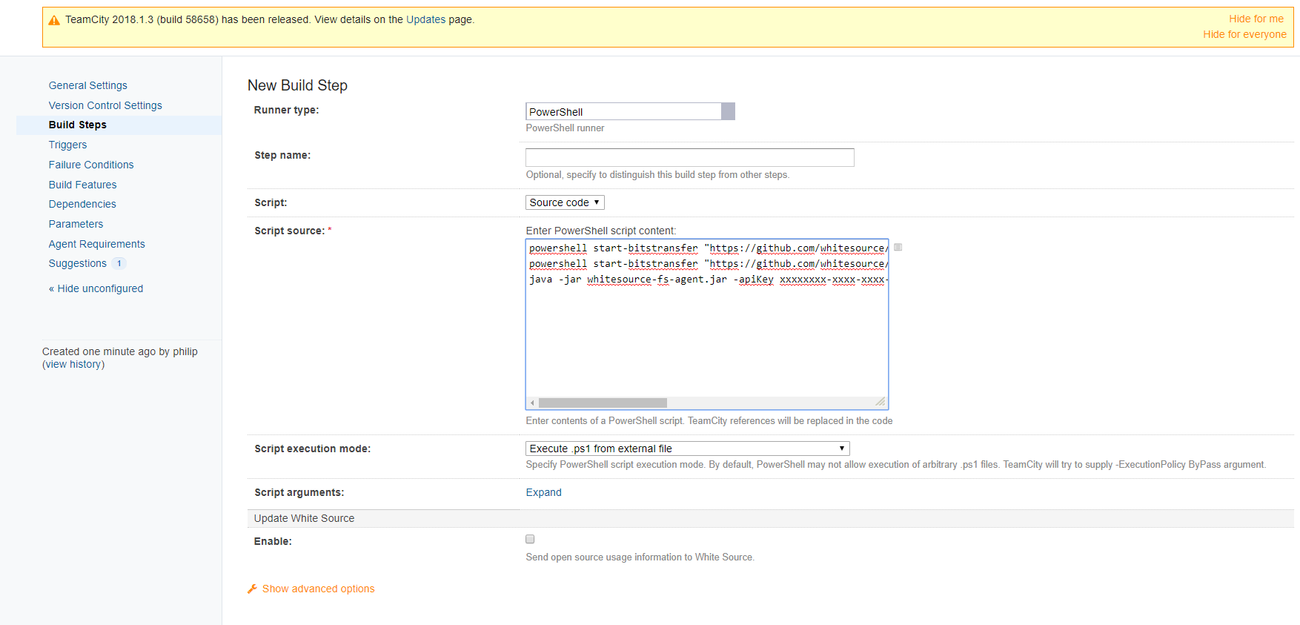
7. Enter the following PowerShell commands and fill in the relevant 'apiKey', configuration path and project path for the machine that you want to scan:
| Info |
|---|
Notice on periodically fetching the Unified Agent It is advised to use the below powershell commands only once a week to download the latest version of the Unified Agent for performance reasons and not as part of every build. You can do this using a scheduler task, such as cron. |
| Code Block |
|---|
powershell bitsadmin /transfer mydownload /dynamic /download /priority FOREGROUND https://github.com/whitesourceMend/unified-agent-distribution/releases/latest/download/wss-unified-agent.jar $pwd\wss-unified-agent.jar powershell bitsadmin /transfer mydownload /dynamic /download /priority FOREGROUND https://github.com/whitesourceMend/unified-agent-distribution/raw/master/standAlone/wss-unified-agent.config $pwd\wss-unified-agent.config java -jar wss-unified-agent.jar -apiKey xxxxxxxx-xxxx-xxxx-xxxx-xxxxxxxxxx -c [path to config file] -project my-project -d [path to folder to scan] |
...
Set the WS_CHECKPOLICIES environment variable to TRUE.
The first command downloads the latest version of the WhiteSource Unified Mend Unified Agent Jar file to the job folder.
The second command downloads the latest version of the WhiteSource Unified Mend Unified Agent configuration file to the job folder.
The third command runs the Jar with the default command line arguments of the Unified Agent.
Make sure that you have edited the Unified Agent configuration file to match your requirements.
Make sure that Background Intelligent Transfer Service (BITS) is enabled on your project job.
9. Save and run the job.
TeamCity Using Shell Scripts
...
2. Create a project via the same steps that were described in the previous section.
3. In the new 'Custom script' window add the following commands:
| Jira Legacy | ||||||
|---|---|---|---|---|---|---|
|
| Code Block |
|---|
curl -LJO https://github.com/whitesourceMend/unified-agent-distribution/raw/master/standAlone/wss_agent.sh chmod +x wss_agent.sh wss_agent.sh -apiKey xxxxxxxx-xxxx-xxxx-xxxx-xxxxxxxxxx -c [path to config file] -project my-project -d [path to folder to scan] |
...
Set the WS_CHECKPOLICIES environment variable to TRUE.
The first command downloads the 'wss_agent.sh' script file to the job folder.
The third command runs the script 'wss_agent.sh'. This script downloads the latest version of WhiteSource Unified Mend Unified Agent Jar file and configuration file to the TeamCity Agent work folder. The script runs the Jar with the default command line arguments of Unified Agent.
Make sure to edit the Unified Agent configuration file to match your requirements.
...
The TeamCity Web application enables you to create custom report tabs that are displayed on its Build pages. This tutorial demonstrates how to create the WhiteSource Mend Policy Violations report as a separate tab:
In the TeamCity Web Application, go to Administration ><Root Project> > Specific project.
In the Projects Settings pane, select the Report Tabs.
Click Create new Build report tab.
Enter the following in the Edit Report Tab Settings window that opens:
Tab Title: Enter the title for the report (e.g., ‘WhiteSource ‘Mend Policy Violations Report’)
Start page: The Start page value should be the path to the WhiteSource Mend Policy Check Summary report (index.html). For example, ‘WhiteSource‘Mend\whitesourceMend\index.htm’
Click Save.
...