
Table of Contents maxLevel 4
...
Prerequisites
Do the following:
For each repository that requires a Bolt scan,
...
the Issues tab must be enabled for each repository.
...
Do as follows:
- Go to the relevant GitHub repository, and click 'Settings'.
- Verify that the 'Issues' checkbox is enabled.
- Check Verify that the 'Issues' tab appears next to the 'Code' tab.
- Ensure that you have administrator permissions to your GitHub account and to the relevant repositories (owner credentials) in order to install and use WhiteSource Bolt for GitHub.
Installing WhiteSource Bolt
- Click the following link. The WhiteSource Bolt for GitHub page is displayed.
- Click Install. Note that if you have more than one GitHub account then you should initially confirm your installation location by selecting the GitHub account(s) for which you would like to install the WhiteSource Bolt for GitHub app. Click the relevant account, and continue.
- Select one of the following options:
- All Repositories (Default): An option to scan all the repositories of the account.
- Only select repositories: Select specific repositories that you would like to scan.
- Read the permissions that must be provided for the WhiteSource Bolt for GitHub app to work, and then click Install.
...
| Parameter | Type | Description | Required | Default |
|---|---|---|---|---|
| minSeverityLevel | String | Enables users to decide whether to open a new GitHub Issue only if a certain Severity Level is available. Available values for "minSeverityLevel" needs to be:
| No | LOW |
Initiating a Scan
New users are entitled to scan each repository up to five times a day. Existing WhiteSource customers have the scan limitations that are set in their account agreement with WhiteSource.
A scan is initiated via a valid GitHub 'push' command. A valid 'push' command meets at least one of the following requirements:
- One of the commits in the 'push' command include added file(s) that have an extension supported by WhiteSource and/or one of the commits in the 'push' command included a removal of file(s) that have an extension supported by WhiteSource. Refer to the WhiteSource Languages page in order to find out whether or not a specific language and its extensions are supported.
- One of the commits in the 'push' command includes a modification in the package manager configuration file(s). This includes any of the following files:
- build.gradle
- pom.xml
- setup.py
- requirements.txt
- Gemfile.lock
- package.json
- bower.json
- Gopkg.lock
- Godeps.lock
- vendor.conf
- gogradle.lock
- glide.lock
- composer.json
- build.sbt
- paket.dependencies
Any metafile with one of the following extensions:
- config
- csproj
- htm
- html
- shtml
- xhtml
- jsp
- asp
- do
- aspx
...
Initiating a Merge Policy
A merge policy utilizes the app's integration with GitHub Checks API. It enables the repository's administrator to approve the merging of a pull request with 'Failed' commit statuses to a target branch in the repository.
For more information on Checks API, see the related GitHub Checks API introduction page.
Prerequisite for the Merge Policy: Add a Branch Protection Rule
...
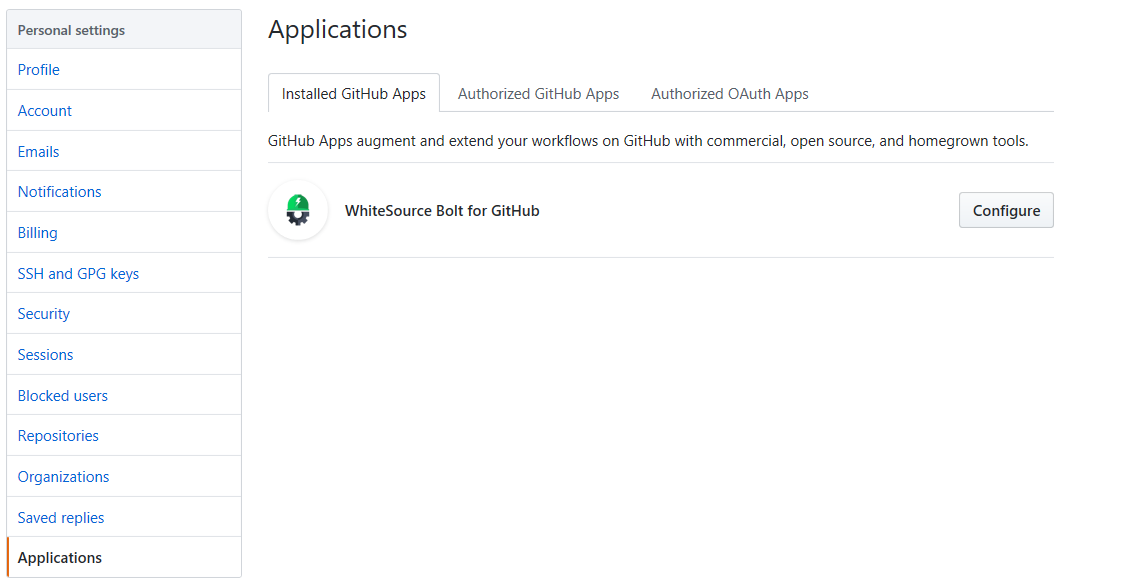
- Go to the 'Applications' section of your GitHub's account settings, and click on the 'Configure' button next to the 'WhiteSource Bolt for GitHub' app.
- The 'WhiteSource Bolt for GitHub' page opens. Scroll down in order to view the 'Uninstall WhiteSource Bolt for GitHub' button.
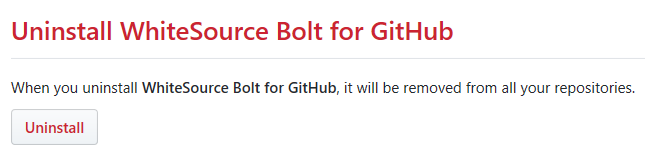
- Click on the 'Uninstall' button. Uninstalling WhiteSource Bolt for GitHub removes it from all your repositories.
- Optionally, go to 'Authorized GitHub apps' tab, and click the 'Revoke' button next to the 'Bolt for GitHub' app.