| Table of Contents |
|---|
Overview
This article provides instructions on how to integrate Jenkins with the Unified Agent.toc
Pipeline Job on Windows Using CURL
- Download CURL, add it to your PATH environment variable.
- Restart Jenkins in order for it to load the new PATH variable.
In the 'Pipeline' select 'Definition: Pipeline script', and add the following lines to the script:
Info title Notice on periodically fetching the Unified Agent NOTE: It is advised to use the below curl commands only once a week to download the latest version of the Unified Agent for performance reasons and not as part of every build. You can do this using a scheduler task, such as
croncorn.
No Format node { stage('Download WS Script') { bat 'curl -LJO https://github.com/whitesource/unified-agent-distribution/raw/master/standAlone/wss_agent.sh' } stage('Run WS Script') { bat 'wss_agent.sh -apiKey xxxxxxxx-xxxx-xxxx-xxxx-xxxxxxxxxx -c [path to config file] -project my-project -d [path to folder to scan]' } }
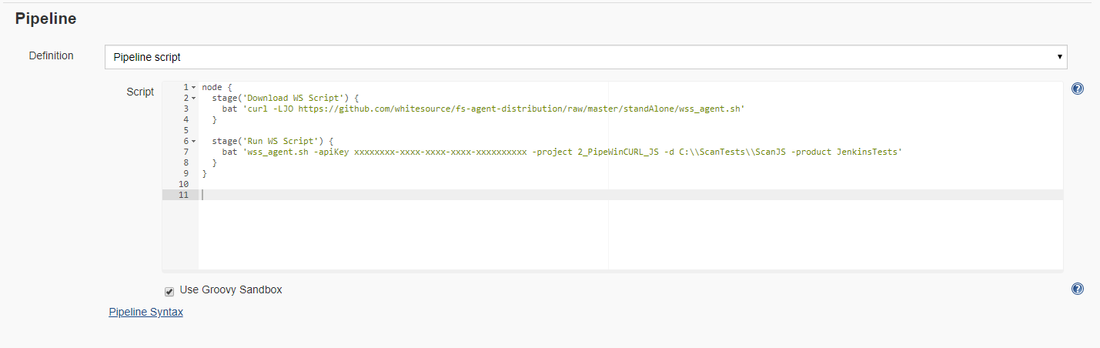
Note the following:
- The first stage downloads the 'wss_agent.sh' script file to the job folder.
- The second stage runs the script 'wss_agent.sh'. This script downloads the latest version of the WhiteSource Unified Agent JAR file and configuration file to your Jenkins job workspace.
...
- Afterwards, the script runs the JAR with the command line arguments of the Unified Agent.
...
- Make sure to edit the Unified Agent configuration file to match your specific requirements.
- You can combine the two stages into one stage.
Pipeline Job on Windows Using PowerShell
In the 'Pipeline', select 'Definition: Pipeline script', and add the following lines to the script:
...